Category Archives: Software Installation

Installing Mythbuntu 10.10 with a Hauppauge Nova-T 500 PCI DVB-T card – PART 1


Having the ability to watch as well as record Digital TV on a PC has always been something which I’ve found attractive, especially if you have a large screen monitor/ TV with at least a VGA/ DVI input.

One option is to take your normal Linux distribution like Fedora or Ubuntu and install something like MythTV

If you want to have a dedicated PC running as a PVR then there are a number of dedicated Linux distributions available:

  • Mythdora is based on Fedora and follows the Fedora development cycle. It uses MythTV.
  • Mythbuntu is based on Ubuntu Linux and comes in two forms. A Live CD which is installable and an add-on package for Ubuntu. It uses MythTV.
  • KnoppMyth originally based on Knoppix Linux the latest version is 5.5. However, development has ceased, being replaced by LinHES. It uses MythTV.
  • LinHES is based on Arch Linux and R6 is the current stable release, R7 is under development. It uses MythTV.
  • LinuxMCE is an open source add-on to Kubuntu to give it media-centre functionality. In addition it can be used to control your home including phones and lighting!

I’m going to use Mythbuntu 10.10. To be honest, I would have written this guide earlier, but have struggled to get to grips with the Mythbuntu and MythTv documentation which is best described as poorly maintained. Hopefully, this tutorial may help make sense of the official documentation!

Installation

Note: If you just wish to added to add it to an existing Ubuntu installation then follow these instructions and then follow the configuration instructions in this tutorial.

We are going to do a complete install, rather than just an installation to an existing Ubuntu based distribution. The first step is to download the Live CD which can be obtained from http://www.mythbuntu.org/downloads. It is recommended that you download the 32-bit version.

Burn the ISO to a CD and on the PC on which you wish to do the install, boot off the Mythbuntu 10.10 Live CD.

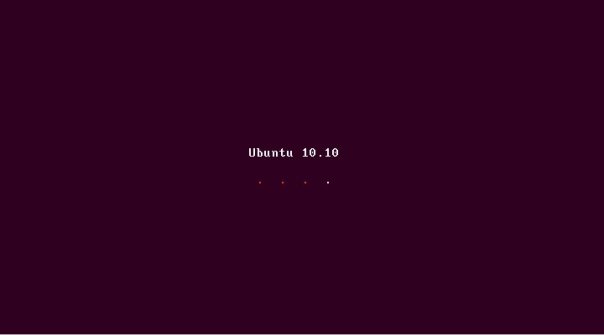
The above two screens will be displayed before the installation screen is displayed. Please note that you may see some error messages displayed during the boot process, do not worry!

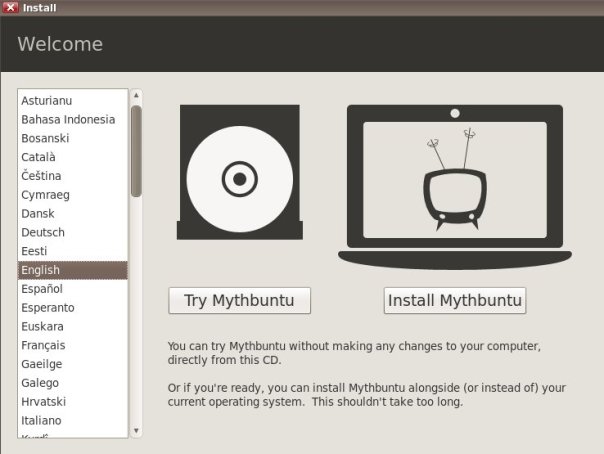
Eventually the installation screen will be displayed, select your language e.g. English.

click Install Mythbuntu.

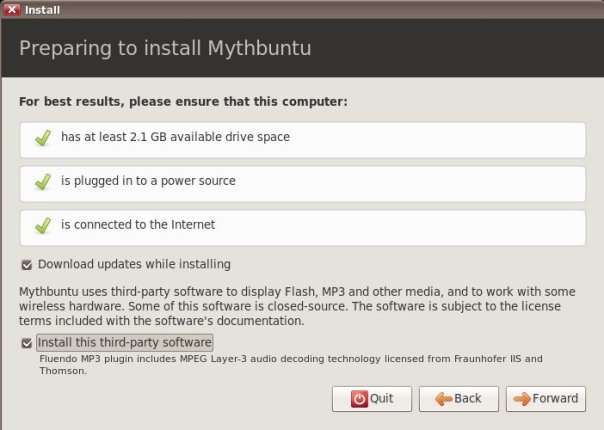
The following screen will be displayed.

Tick the check boxes for Download updates while installing and Install this third-party software.

Then click Forward to continue.

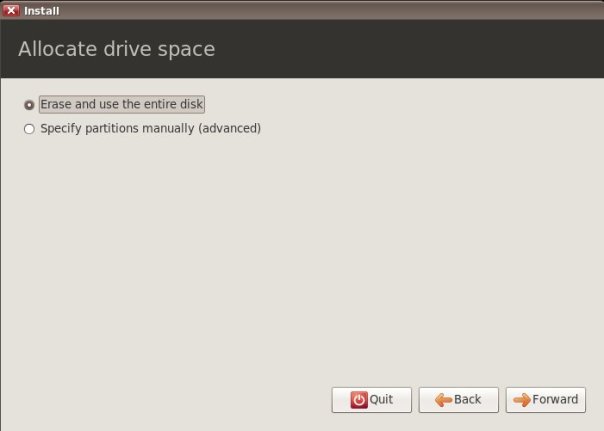
You will now be asked to create a partition in which to install Mythbuntu. In this tutorial we are going to use the whole hard disk, so we will select Erase and use the entire disk .

Then click Forward.

You will new be asked to confirm what you wish to do.

When you are happy click Install Now.

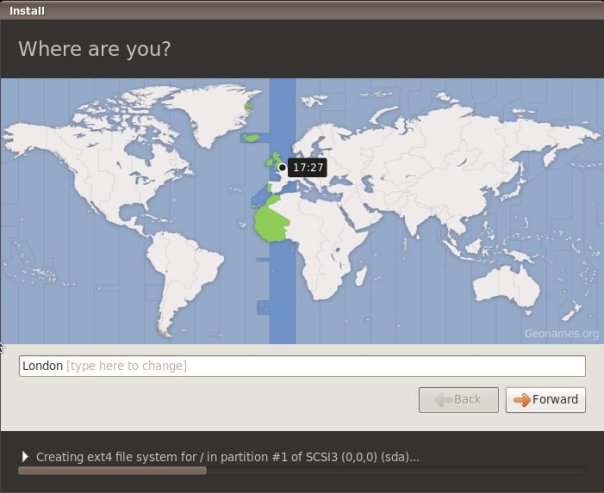
As with any Linux install you will need to specify your time zone.

Once done, click Froward.

Keyboard layout. Again click Forward when done.

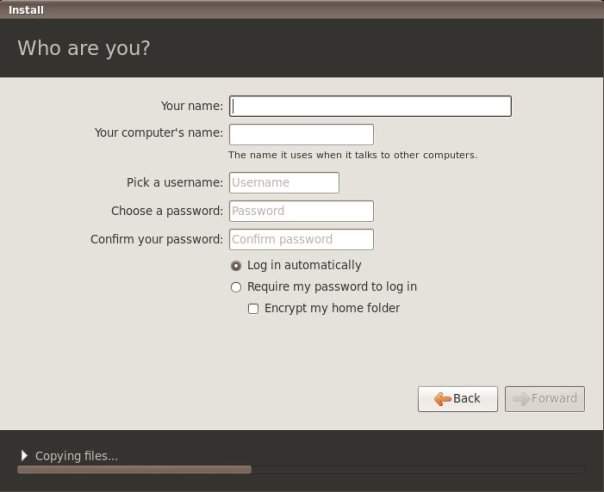
Now enter your login credentials.

As this is a media centre PC, I leave it to login automatically.

Once set-up, click Forward.

You now need to decide whether you want to have a dedicated “back-end” server, basically doing all the recording and streaming of video/ TV or a Frontend or a Primary Backend with Frontend ( a combination of both).

For our installation we will go for a Primary Backend with Frontend.

Once selected, click Forward.

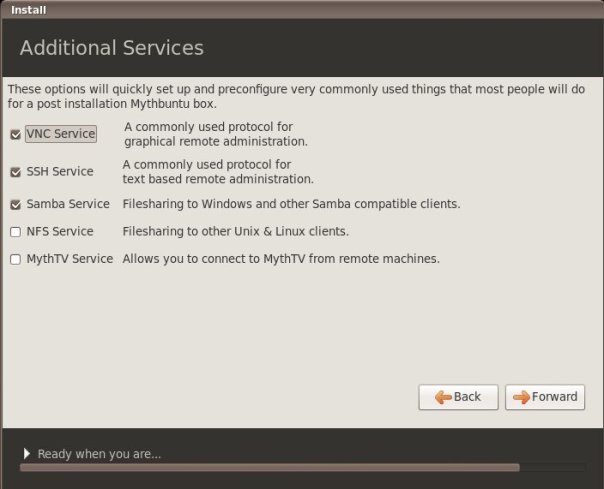
You are then asked what additional services you need installed. Samba and SSH are selected to be installed by default, but I always feel it is useful to install VNC as well in case you need to remotely manage the server using its graphical interface.

Once you have made your selections click Forward.

You are then given the opportunity to enable the Remote Control for your DVB-T card. Tick the check box Enable a Remote control, select the relevant remote, in our case the Hauppaugu Nova-T 500 and tick the check box Generate frontend restart mapping (Power followed by Clear).

When ready, click Forward.

Mythbuntu has now collected the information it needs and will commence installation.

Once installation has completed you will get the following window displayed. Click Restart Now to reboot the PC.

Your installation CD will be ejected and once removed, you will need to press Enter to continue the reboot.

On reboot the above screen will appear.

As MythTV has not yet been configured, press ESC and confirm to exit MythTV. The XFCE desktop environment will be displayed

In part 2 of this tutorial we will set-up our DVB-T tuner card to receive Freeview as well as the program guide (EPG) information through XMLTV.

=-=-=-=-=
Powered by Blogilo

FreeNAS 0.8 Beta 2/12/10 – Installation and Basic Configuration


Back in August I explained how to Install FreeNAS 0.7 Network Attached Storage Server on to a low specification PIII PC with plenty of disk storage.

Back in November iXsystems announced FreeNAS 0.8 Beta with the following changes:

  • FreeNAS 0.8 has undergone a complete rewrite.
  • The GUI has been redesigned to be easier to use and extend. Rewritten using Python and Django.
  • Improved hardware support, faster I/O, better modularity, and easier upgrades (see Note below).
  • The base system has migrated from FreeBSD 7.x and the m0m0wall build system to FreeBSD 8.1-RELEASE and NanoBSD.
  • The installation types have changed; there’s no longer an embedded or full install, nor can the image be installed on a data disk. You must now install FreeNAS onto a dedicated device.
  • FreeNAS 0.8 features ZFS version 14
  • The media centre features of the box have not been reimplemented in the core FreeNAS package. This will be added as an add-on at a later date.

So as the user interface has changed, I though it worth rewriting my August blog post.

One thing to note is FreeNAS version 0.8 currently ONLY supports upgrades to FreeNAS 0.8. It is not possible to upgrade from 0.7 or earlier.

These instructions were written using the FreeNAS 0.8 Beta release of the 02/12/10 running in a VirtualBox VM. I do not recommend using any Beta software for any purpose other than testing, as by it’s nature it is incomplete and undergoing rapid development.

What you Need!

  • One low specification PC, the less power it consumes the better as a NAS box generally gets left on for hours/ days on end. A Pentium III is probably a good starting point, with 512Mb of RAM, but if you are serious about power consumption then an Intel Atom or similar CPU is recommended.
  • A 512Mb (for RC2 this is now 1Gb, thanks to vyccid for letting me know about this change) USB stick (assuming the PC can boot* off a USB device) or a low capacity hard disk on which to install the operating system
  • At least 1 hard disk to store your data.

* If your PC does not support USB boot a work-around is to use http://www.plop.at/en/bootmanager.html

Installation

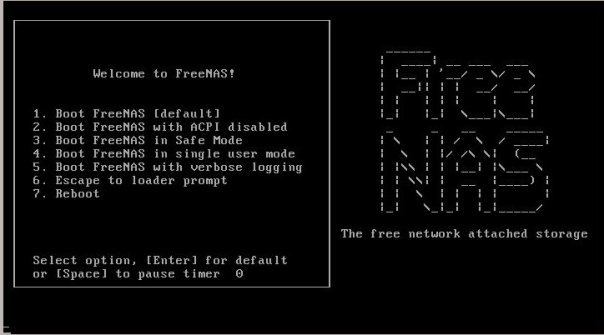
Boot off the FreeNAS 0.8 CD, you will briefly be shown the following screen before the default option is selected and you are taken to the main installation menu.

The main boot menu will then be displayed.

Choose option 1 and select OK

All available physical disk media will now be displayed. In my case below I have one 256Mb hard disk available. This will become the FreeNAS system disk. I will add my data disk later, although this is not a requirement.

Select the disk you wish to install FreeNAS on (remember this disk is only for the operating system) so does not need to be large. Select OK.

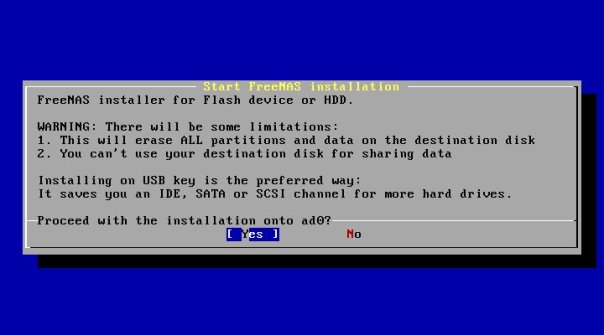
Before FreeNAS is installed on the chosen disk, you will get the following warning message. Read it and if happy select Yes.

The disk will now be formatted and the operating system installed.

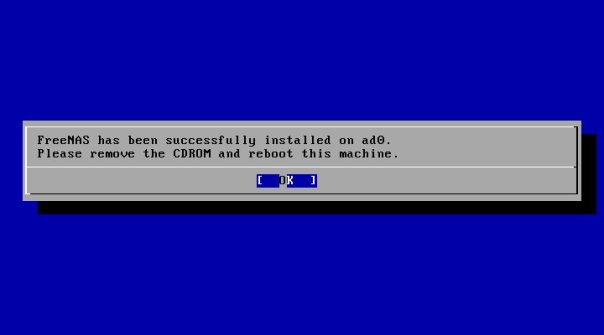
Once this has completed, the following screen will be displayed. Follow the instruction and then press OK.

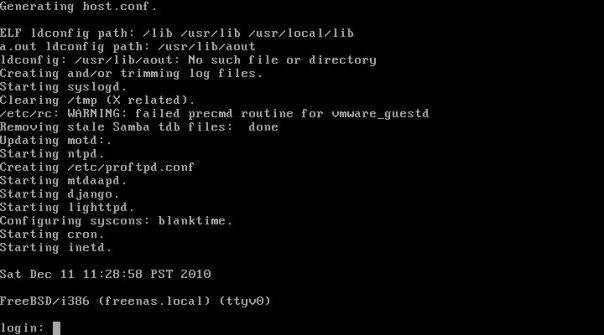
On reboot you will be given a FreeBSD login prompt as below.

Enter the username of root and the password of freenas to login.

The first problem you will encounter is that there is no menu for setting the IP address or even a display of what it current IP address is set to! Hopefully, it will be recognised by the FreeNAS developers that this is an oversight.

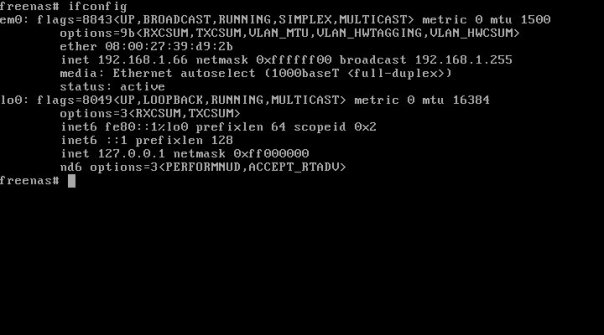
To display you IP address enter the command ifconfig, you will see something similar to the following screen-shot which shows an IP address of 192.168.1.66

Setting the IP address is now only possible, unless you like using Vi editing Unix configuration files, via the web interface. Whilst this may seem like a backward step, I think it is a good move as it means that all configuration is now done through the GUI.

Open a web browser and type in the IP address. In our case this is 192.168.1.66. You will then get the login screen.

Enter the defualt username of Admin and the password of freenas

You will be taken to the FreeNAS Home page

The first thing you need to do is change you Timezone in the settings tab, using the drop-down, then click Save Settings.

Setting a Fixed IP Address

To do this, in the toolbar click on Network and then in the Network Settings tab, select Interfaces.

Click Add Interface.

Normally you will select em0 if you only have one NIC in your PC. lo0 should not be used as it is local.

You can give your interface any name you wish but I tend to stick to calling my interfaces eth followed by a number in this case 0.

Then enter an IPv4 IP address, I will use 192.168.1.200.

Click Add Interface.

At this point your connection with your FreeNAS web interface will be lost as you have changed the IP address of the server from a variable DHCP address to a fixed address.

In your web browser change you IP address to the new fixed address. In our example this is 192.168.1.200.

You will be asked to login again and you will then be shown your network interfaces window

Attaching Storage

So far all we have done has been to install the FreeNAS operating system and set a fixed IP address. The next step is to make our FreeNAS server useful and turn it into a network storage device by adding disks.

To do this click on Storage on the FreeNAS toolbar.

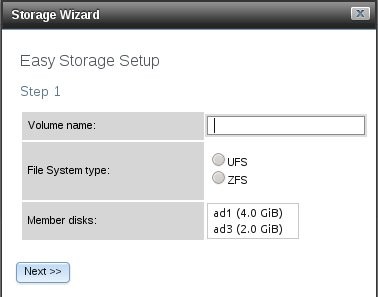
Now click Storage Wizard. The following window will be displayed

Enter a Volume Name, we are going to use NASDISK1

Select the file system type, I’m going to use UFS as the future of ZFS remaining opensource under Oracle in currently in question. A real shame as this is a good file system.

Finally select the disk you want to assign to the Volume. I have two ad1 and ad3. I will select ad1.

Click Next>>

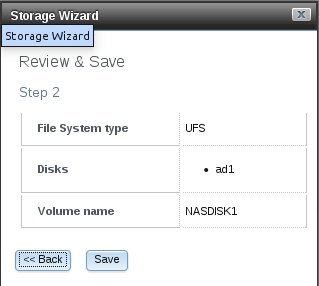
You will now get a summary screen of your settings, click Save

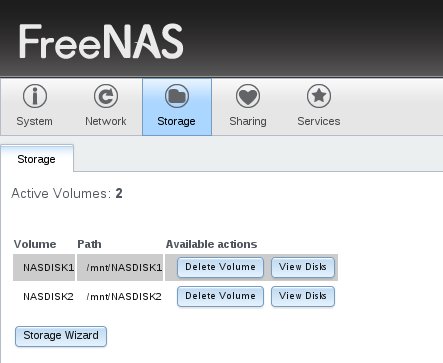
Having repeated this process for my second disk, the store screen now looks like the following, showing two active disks.

I’m now going to edit some of the default settings for each of my disks by doing the following:

  1. Click the View Disks button for NASDISK1
  2. The Disks in volume 1 window will appear, click Edit for ad1
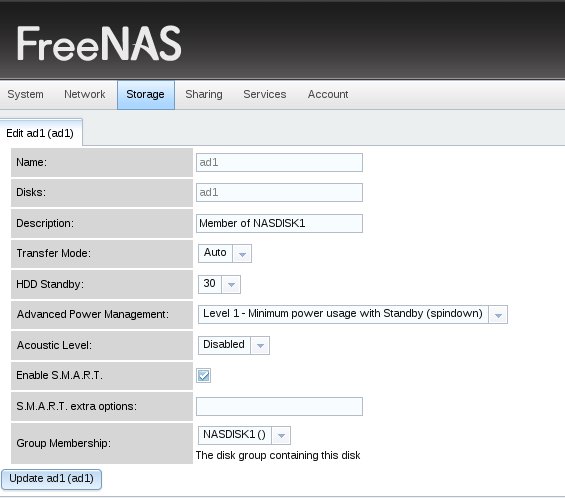
  3. I’m going to set the following:

HDD Standby will be set to 30 seconds

Adcanced Power Management will be set to Level 1

Th results will look as follows

Click Update ad1 (ad1) and then repeat for all remaining disks.

Sharing the Disks (Windows Shares)

With the disks mounted and a file system allocated, the next step is to share the disks. In this example I’m going to use Windows Sharing as this is universal to all operating systems.

From the FreeNAS toolbar click on Sharing. The following screen will be displayed

Click Add Windows Share. You will be asked for the following

  • Share Name, in this example I will call it WINShare1
  • Path, this is the disk you want the share to be associated, so in this example we will select /mnt/NASDISK1 from the drop-down menu.

The results will look like the following screen-shot. Click Add Windows Share to save the settings.

Repeat for all remaining disks you wish to share.

Once you have finished your Sharing screen will look similar to the following

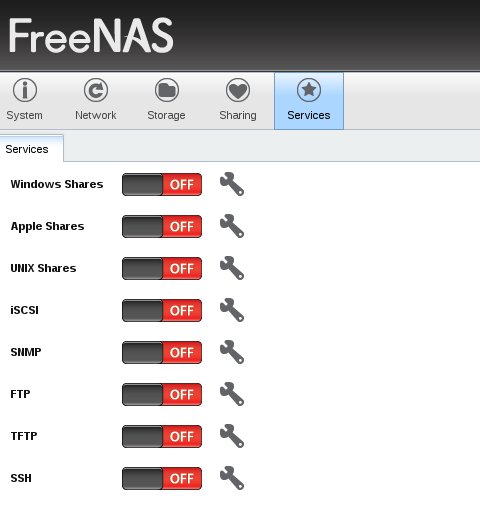
With your shares set-up, you now need to start the Windows Shares service. To do this click Services on the FreeNAS toolbar.

Click on the OFF button adjacent to Windows Shares, this will turn on the service, the button will change to ON.

Note: I’m not sure of this is a problem or not, but I found that after setting up the shares, it was necessary to reboot the server otherwise you will be asked for a login id and password and nothing seems to work! This might have been because I enabled the Samba service for the first time for Windows Shares.

When browsing for Windows shares, some reason they appear under the workgroup of MyGroup. This is not configured in /usr/local/etc/smb.conf as the Samba workgroup is set to FREENAS. So I assume must be a unexposed configuration setting in the FreeNAS configuration file and I can’t find a setting in the GUI.

Conclusion

The interface is considerably easier to use when setting up shares, in fact is it very “polished” compared to FreeNAS 0.7. and should attract a lot more non-technical users. The issue of not displaying the default DHCP IP address on boot-up is a problem in this respect and I hope this is addressed before the final release candidate is published.

Currently, in terms of functionality FreeNAS 0.8 does not compare to 0.7 as a lot of the functionality is missing. Anyone planning to move to 0.8 from 0.7 will find that unless they use FreeNAS as a basic NAS server, this is a retro step, especially as there is no upgrade path from 0.7.

From what I can tell, the following functionality is currently missing when compared to 0.7:

  • User Account creation and permission setting on shares – currently absent and this needs to be urgently addressed via the GUI.
  • File Browser and Editor – currently absent
  • Plug-ins – currently absent
  • System Information screen only provides Basic details, Live CPU, Memory and Disk Space Usage is missing
  • The Backup option is missing, as are system packages.
  • Not sure whether a Firewall is present and if it is there is no GUI to configure
  • Users and Groups are missing
  • Only file sharing services are currently present, thing like iTunes, Webserver, and BitTorrent are missing

Hopefully this will be partly resolved in the final release, bearing in mind that this is only a Beta and a lot can change! Furthermore, it would be very unfair to disregard the amount of progress made in the past 12 months in the development of FreeNAS. If this pace continues, then I’m sure it won’t be too long before missing features are restored.

What is very clear is that a lot of effort has been put into making FreeNAS very easy to use. In my opinion the developers have done an really excellent job.

A lot of the missing functionality is because 0.8 is a complete re-write and therefore the developers have had to effectively start from scratch, so the absence of features is very understandable

I really look forward to watching how the FreeNAS 0.8 development progresses in 2011. If most of the missing features in 0.7 are eventually restored in 0.8, then I’m definitely upgrading to what looks like becoming the ‘killer’ NAS solution outside of using dedicated hardware.

Congratulations to the FreeNAS team for continuing to create a excellent NAS solution.

=-=-=-=-=
Powered by Blogilo

Using Clonezilla with FreeNAS or Network Share to Backup a Hard Disk


If you’ve used Symantec Ghost http://en.wikipedia.org/wiki/Symantec_Ghost or Acronis True Image http://en.wikipedia.org/wiki/Acronis_True_Image then you will know how useful they are for making images of computer hard disks. Great for backing up all your data or even for disaster recovery. The down side is they are both expensive programs to buy and for us Linux users, not free (as in beer or as in speech).

Clonezilla http://en.wikipedia.org/wiki/Clonezilla is in my view as good as, if not better than, the closed source competition and is highly regarded by IT professionals. I use Clonezilla regularly to image PCs before doing a distribution upgrade and I image both Linux and Windows partitions. I also use it for backing up hard disk and for migrating data between disks. For the latter I use Clonezilla along with GParted Live http://gparted.sourceforge.net/livecd.php. to resize partitions after the cloned image is restored to a new (larger) hard disk.

Because it runs from a ‘live’ CD (ISO image obtainable from http://tinyurl.com/c2myn8) and will read most hard disk formats including NTFS, Clonezilla is OS agnostic. It can backup at partition level to another hard disk or to a USB hard disk, and as we shall see it can also back up to a network share, or in our case to a FreeNAS storage server*.

*See my earlier blog posts on installing and configuring FreeNAS http://preview.tinyurl.com/2eglwrm and http://preview.tinyurl.com/2978jqv .

Cloning a Hard Disk

Insert the Clonezilla ‘Live CD’ and boot the PC off the CD.

The following menu will be displayed.

Select the default option, and press the Enter key. Clonezilla will boot.

Eventually displaying the following “choose language” screen.

Select your language, then press the Enter key.

The “configuring console data” screen will appear

Accept the default and press the Enter key.

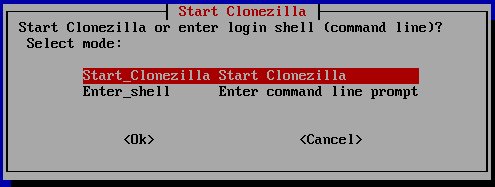
You will now be given two options, as we don’t want the command prompt, choose the default option Start Clonezilla and press the Enter key.

You will now get a screen asking if you wish to work with images or clone from one physical disk to another (duplicate). Choose the device-image option and press the Enter key.

You will now be asked where you are going to save the image to, as FreeNAS runs Samba, we will choose samba_server.

Press the Enter key.

Note: If you are not using FreeNAS, but are instead saving to a Windows or Linux Samba share, then you would still select this option.

You will now be asked to set-up a network IP address for Clonezilla so that it can connect to the network share.

As we have a DHCP server (in my case it is my DSL router) I’m going to select dhcp.

Press the Enter key to continue.

Once Clonezilla has obtained an IP address from the DHCP server, you will be asked for the IP address of the Samba server which contains the file share you wish to connect.

In my case the address is of the FreeNAS server is 192.168.1.252, yours is probably different.

Once you have entered the address, press the Enter key to continue.

You will be asked to provide the domain name, if you don’t have a domain name set you can leave this blank. In my case mine is called workgroup.

Press the Enter key to continue.

You will now be asked for a username to connect to the FreeNAS server, the offered name is Administrator. Replace this with a valid username for your network share. In my case I have a username of fernsm1 set-up on my FreeNAS server.

Press the Enter key.

You will then be asked for the destination directory, and will be offered the directory name of /images. Replace this with the name of your network share and the directory within that share you wish to save the image in to.

In my case this is /NASDisk1/images, remember that Unix and Linux operating systems are case sensitive. So if the share name is in upper case, make sure you write it in upper case!

UPDATE: 15/12/10

You can also enter the share name. So in my example the Samba/ CIFS share name is /DiskImages and you just enter what I’ve put in bold text. You may find this more reliable than specifying the actual path.

When done, press the Enter key.

The following screen will be displayed. This is a summary of what you have entered so far, and warns that you will now be asked to enter the password.

Press the Enter key.

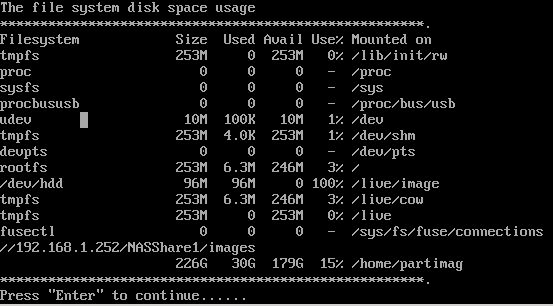
At the bottom of the screen the following will appear.

The above is the command string being used to connect Clonezilla to the share.

Type in your password and press Enter.

If the following will be displayed, this means that Clonezilla has successfully connected to the FreeNAS server/ network share. if you get an error message at this stage, check the share name and/ or username/ password and start again.

Press the Enter key.

You now need to select the mode you wish to run Clonezilla in, a list of choices will be displayed

As we are creating an image of the PC, we will use the savedisk option. Select and press the Enter key.

You will then be asked for a name to give the image. By default Clonezilla gives a unique file name based on the date and time. When you have give a file name for the saved image, press the Enter key to continue.

You will now be asked to select the hard disk on the PC which you wish to clone. If you only have one hard disk, just press the Enter key. Otherwise use the cursor keys and space-bar to select/ deselect a disk..

You will now go through a number of screens offering “advanced extra parameters”. Accept the defaults on all.

Once completed, Clonezilla builds a command string should use wish to use it again without having to go through all the menus. In our case it should look similar to the following

Press the Enter key to continue.

Clonezilla will now start the cloning process, telling you what it is about to do and giving you the option to cancel.

If you are happy with the summary it provided, press y followed by the Enter key to continue.

Clonezilla will check the file system of the source PC to ensure okay and determine the cloning method it will use before it starts to clone the hard disk. If satisfied, it will then commence the cloning process.

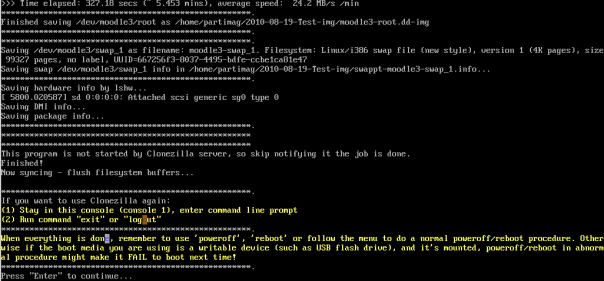
Once the disk has been cloned, you will see something like this

Congratulations, you have successfully cloned your PCs hard disk to your FreeNAS network share.

Pressing Enter, will give you an options menu:

  1. Poweroff
  2. Reboot
  3. Enter command line prompt
  4. Start over

Warning: The default is option 2.


=-=-=-=-=
Powered by Blogilo

FreeNAS Network Attached Storage Server – Part 2: Configuration


In Part 1 we installed our FreeNAS Server on an old PC gathering dust in the corner of the office. In my case this is a Pentium III 800MHz Compaq Deskpro EN tower, maxed out with 512Mb of RAM and a Promise PCI SATA/ IDE card to manage large 250Gb+ hard disks. For FreeNAS this is quite a high spec PC as it can run with 256Mb RAM and a Pentium II CPU!

In Part 2 we are going to configure this PC into to a fully fledged NAS Server.

Configuring FreeNAS Server

Changing the Admin Password

This is the first thing we need to do, now the server is up and running.

From the FreeNAS menu bar, click on System > General and select the Password tab. Your old password is already entered for you, so enter your new password (twice) in the fields provided.

When done, click Save.

The following message will be displayed.

Note:

If you wish you can also change the username from Admin to something else, this can be done from the General tab under WebGUI section. In the Username field enter the name of the username you wish to use, go to the bottom of the page and click Save.

Set-up the File Sharing Service (CIFS/ SMB)

From the FreeNAS menu bar, click on Services > CIFS/ SMB.

Note:

SMB http://en.wikipedia.org/wiki/Samba_%28software%29 and CIFS http://en.wikipedia.org/wiki/Cifs allow Unix/ Linux, Apple OSX and Windows PCs to access the share.

Tick the Enable check box (top right of screen)

Scroll to the bottom of the screen and click on Save and Restart.

The screen should refresh and you should see

Adding the Disk(s) to FreeNAS

From the FreeNAS menu bar, click on Disks > Management, the following screen will be displayed

As we are adding a disk, click on the + symbol on the right.

Now from the Add window, click on the drop-down in Disk field, this will display all your “disk” devices including removable media, like my DVD ROM drive. FreeBSD (Unix) labels disks differently to Linux. ATA type disks (IDE/ SATA) are prefixed with ‘a’, followed by ‘d’ short for disk, CD devices are followed by ‘cd’. A number is allocated for each device, and the device information read to help you identify which device you are selecting.

In the above example, ad1 is a 8Gb IBM hard disk of which 128Mb was allocated to FreeNAS in part 1, the rest is available to use. The remaining ad devices are a 250Gb Hitachi SATA hard disk (ad6) and a 300Gb Maxtor IDE hard disk (ad8). We will select ad6 as our first disk to mount.

As I don’t wish my disks to spin when not in use (it’s good to try to save energy when setting up a NAS box), I’m going to set the Hard disk standby time to 10 minutes.

I’m also going to activate S.M.A.R.T. Hard disk monitoring as I will not be using a software RAID disk in this NAS configuration as I want to maximise my available disk space. Tick Activate S.M.A.R.T monitoring for this device.

Click Add to save the settings, you will be returned to the Disk Management screen. An information box will advise you to click Apply to apply the changes to the disk. Once clicked, the disk status will change from initialising to ONLINE.

Under the File System column, you will notice that the disk is showing as unformatted.

Format the Disk

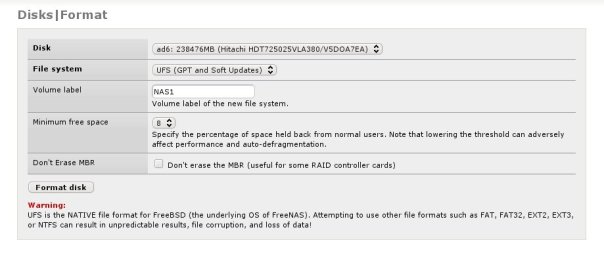
To format the disk, from the FreeNAS menu bar select Disk > Format.

In the Disk field, select the disk you wish to format, in our example only one is listed because only one disk has been added to FreeNAS.

Give the disk a Volume label, this will be used to identify the disk. In our example, I’m calling this disk NAS1.

The completed screen should look like the following

As you will notice, I’ve headed the warning at the bottom of the screen and have kept the default UFS (Unix File System). You are now ready to format the disk, so press Format disk. You will be asked to confirm, click Okay.

The disk will be formatted and the lower half of the screen will fill the output of the format command (sets of random numbers). Once formatting has completed the word Done! will appear at the bottom of the list.

From the FreeNAS menu bar, click on Disks > Management, under the File System column, you will notice that the disk is now showing a UFS file system.

Mounting the Disk

Although the disk is online, and formatted it is not available to use as it has yet to be mounted. To mount a disk from the FreeNAS menu bar, click on Disks > Mount Point.


Click on the ‘+‘ sign on the far right, as you are going to add a disk. In the Mount Point Add screen, in the Disk section under Settings, select the hard disk you have just formatted. Now give it a Mount point name, I’m going to call it in this example NASDisk1.

If you wish you can also give it a description, in the description filed below.

Likewise, you can set the normal Unix/ Linux Read Write and eXecute permissions for different groups of users, set the owner, default is always root (administrator), and add the disk to a group. For our purposes, we will leave this as per the defaults.

See completed screen below

Click Add, you will be returned to the Mount Point Management window, where the disk will show a status of initialising. Click Apply Changes, the disk will be mounted and the status will change to OK.

Whilst in the window, you may notice there are two other tabs, Tools and Fsck. The former allows you to mount or umount (unmount) a disk and the latter which stands for File System Check is used to check the consistency of the Unix/ Linux file system, similar to chkdsk in DOS/ Windows.

Sharing the Disk

From the FreeNAS menu bar, click on Services > CIFS/ SMB. Click on the Shares tab, we are now going to share the disk so that it is available to access over the network.

Click on the ‘+‘ sign on the far right, as you are going to add a share.

Give a Comment for the share, this can be anything useful.

Give the share a name e.g. NASShare1.

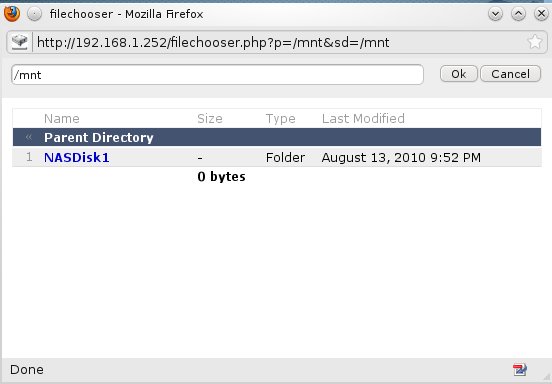
In the Path field, you are now going to create the share. Click the browse button, a window similar to the following should appear

NASDisk1 is the mount point for the disk we created earlier. Click on it to select, and then click Okay.

The resulting screen should look something like

Click Apply changes.

You have now created your share on the network.

Accessing the Share over the Network

Now browser the network for the samba share using your file manager:

For Linux

In KDE Dolphin, or in GNOME Nautilus you can either browse your network for the Samba share or enter smb://192.168.1.252/NASShare1/ .

It is also possible to automatically mount a Samba share, for more information see https://help.ubuntu.com/community/SettingUpSamba .

For Windows

Open Windows Explorer or Start > Run and enter \\192.168.1.252\NASShare1.

As we have not set-up security on the share, no password is required, and therefore you should be able to browse you FreeNAS share, add and remove files.

You have now set-up your FreeNAS server Samba share.

Setting up a User Account to Remotely Access the Share

Whilst you can get away with having no user account set-up for remote access to the share, some programs expect a user account. One of them is Clonezilla, which I will be using in my next blog to image up a PC to the FreeNAS server.

To set-up the user account

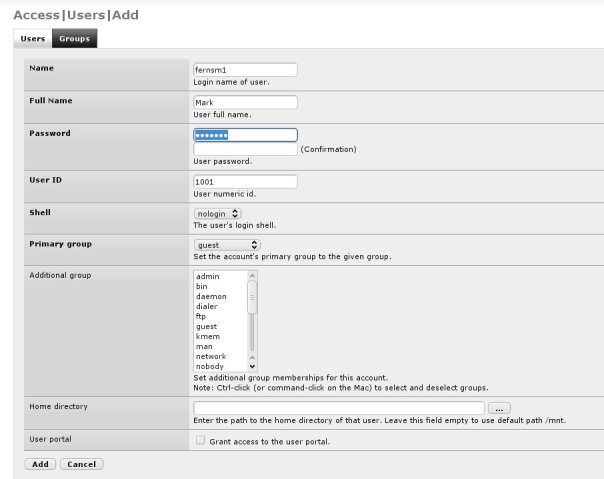
From the FreeNAS menu bar, click on Access > Users and Groups. Click on the ‘+‘ sign on the far right, as you are going to add a new user.

In the Name field, enter the login name for this account.

In the Full Name field either give the users full name or a description of the purpose of this account

In the Password field, enter a password, (twice)

When complete click Add.

The above screen will appear, click Apply changes. You have now created an account to remotely access the share.

In Part 3, I will be looking at configuring some of the other more advanced features available in FreeNAS, including setting up a software RAID and configuring FreeNAS as a Bittorrent server.

=-=-=-=-=
Powered by Blogilo

FreeNAS Network Attached Storage Server – Part 1: Installation


The appeal of having a Network Attached Storage “box” on the network is great if you wish to have a central place to store your data. However, NAS boxes are expensive starting around £100 and going up to £600 for a Drobo and that’s before you add the hard disks.

If you are like me, you probably have a PC sitting in the corner looking for a new use, and wouldn’t it be great to turn it into a NAS server, and a FTP server and download bittorrets with it….. Well your can, and using FreeNAS you can have it all for free!

In my case this is a Pentium III 800MHz Compaq Deskpro EN tower, maxed out with 512Mb of RAM and a Promise PCI SATA/ IDE card to manage large 250Gb+ hard disks. For FreeNAS this is quite a high spec PC as it can run with 256Mb RAM and a Pentium II CPU!

FreeNAS is an open source Linux distribution based on FreeBSD http://en.wikipedia.org/wiki/FreeNAS. It works as a preconfigured "software appliance". Like any appliance, it needs to be set-up and this is mainly done through a very user friendly web interface.

The following instructions will walk you through installing FreeNAS.

FreeNAS can be downloaded from http://freenas.org/downloads.

Installing FreeNAS Server

Boot off the FreeNAS CD, you will get a boot menu with a countdown timer, allow the PC to boot with the default boot option.

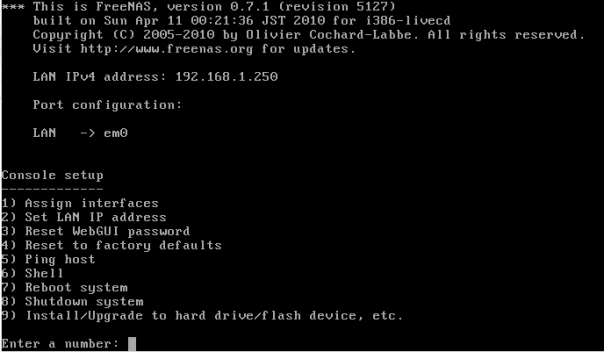
Once booted you will get a menu similar to that below

Select option 9) Install/ Upgrade to hard drive/ flash device, etc.

You will be presented with a number of options as FreeNAS can be installed on a variety of different types of media including USB memory sticks.

We are going to choose option 3 ‘full’ OS install to HDD (Hard Disk Drive), the following will be displayed.

Press enter to confirm.

You will then be asked to select the CD ROM drive the FreeNAS CD is in. Select the drive and press enter.

You will now be asked to select the hard disk on to which to install FreeNAS. Again select the drive and press enter.

The FreeNAS installer will ask you to set the size of the FreeNAS partition

Select the default (128Mb) and press enter.

On being asked about whether you would like a swap partition, select No.

The FreeNAS CD ROM will now be mounted and FreeNAS installed.

Once the installation has completed, you will get a message similar to the following

When you press enter, you will be returned to the Console Set-up menu.

Configuring the Network Interface

Select option 2 Set LAN IP address

You will be asked the following

You now have two options:

Option 1 (If you select Yes): DHCP allocated IP Address

The advantage of DHCP is that you don’t have to worry about configuring the IP address, this is by far the lest technical way of setting up the server and works well if you don’t plan to turn it off.

If you select this option, you will then be asked if you wish to configure the network interface for IPv6. For most people, the answer will be No (default). Press enter, after a few seconds you will get a something similar to the following:

This tells us that the FreeNAS server has an IP Address of 192.168.1.66 and the web interface can be accessed by entering http://192.168.1.66:80 in a web browser. The :80 means that the website will be accessed on port 80.

Pressing Enter returns yo to the main menu.

Option 2 (If you select No): Fixed IP Address

If you answer No, you will be asked to enter your own IP address. Make sure that the first three sets of numbers correspond to your network address range. To check open terminal and enter ifconfig. You should see something similar to the following

Enter the first three sets of numbers which make up the inet addr e.g 192.168.1 and then enter the final number which must be available to use. If uncertain, from terminal enter ping followed by the full IP address you wish to use. If you get the Message “Destination Host Unreachable” then it is unlikely that that IP address is being used. Press CTRL+C to terminate the ping.

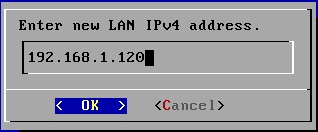
Enter the fixed IP address you wish to use.

Select OK and press enter.

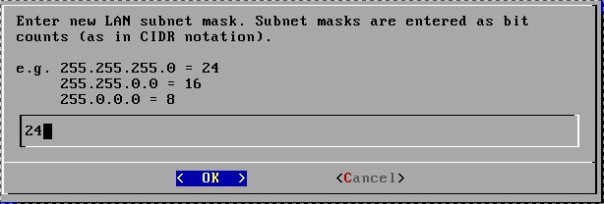
You will now be asked to enter the subnet mask using CIDR (Classless Inter Domain Routing) http://en.wikipedia.org/wiki/Classless_Inter-Domain_Routing notation

The easiest way to work out this two digit number from your subnet mask which in our example we got 255.255.255.0 from doing an ifconfig (see above) is to use a online calculator. I use http://grox.net/utils/whatmask/ which is simple to use.

Enter the IP address, and press Go, you will get something similar to the following

In this example the CIDR number is 24. Enter it and select OK.

You will now be asked to enter your default Gateway, this is normally 254, so in this example you would enter 192.168.1.254.

You will next be asked for a DNS IP address. Unless you are running your own DNS server, leave this black and select OK. Other wise enter your DNS server IP address.

You will then be asked if you wish to configure the network interface for IPv6. For most people, the answer will be No (default). Press enter, after a few seconds you will get a something similar to the following

This tells us that the FreeNAS server has an IP Address of 192.168.1.120 and the web interface can be accessed by entering http://192.168.1.120:80 in a web browser. The :80 means that the website is being accessed on port 80.

Pressing Enter returns you to the main menu. You are now ready to login

Logging in to you FreeNAS Server

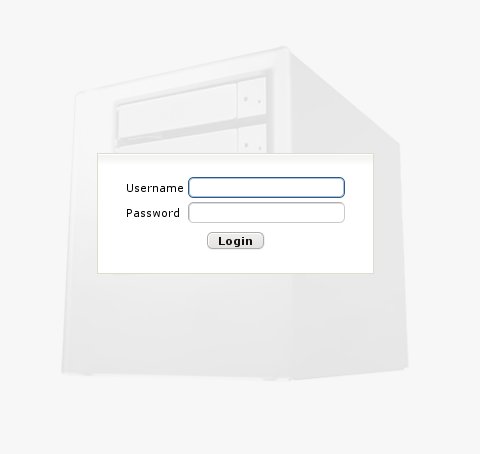
On a network attached PC, open a web browser and enter the ip address 192.168.1.120:80.

The following login screen will be displayed

Enter the following login credentials:

Username: admin

Password: freenas

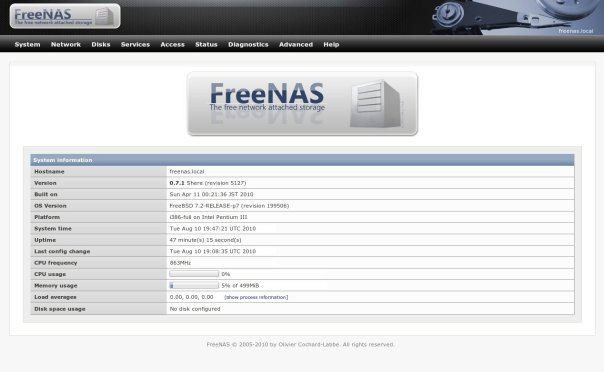
The FreeNAS home page of you server will now be displayed

You have successfully installed your FreeNAS server.

In Part 2, I’ll be looking at configuring FreeNAS and mounting your storage so it is accessible from other computers.

Installing VirtualBox Guest Additions on Ubuntu Server 10.04


Because Linux servers do not normally run with a Window Manager like KDE or GNOME, the only benefit of installing guest additions on a VirtualBox VM is so that you can share drives/ folders with the host.

A common misconception is that you can resize the window and being able to copy and paste between host and guest OS. However, you can’t do any of these as you are not running a window manager!

To install Guest Additions, do the following:

Sudo apt-get install dkms

sudo apt-get install build-essential

Reboot the server by entering the command

sudo reboot

Login in to the server.

Go to the Virtualbox Devices entry on the menu bar of the guest OS and select Install Guest Additions… , this will load the Guest Additions ISO CD image.

Change directory to media

cd /media

Create a directory called cdrom, this will become our mount point

sudo mkdir cdrom

Mount the Guest Additions ISO to the mount point

sudo mount /dev/cdrom /media/cdrom

Now change to the cdrom directory

cd /media/cdrom

Display the directory contents i.e. the ISO image

ls

Depending on whether you are running a 32bit or 64bit OS, run the relevant installer. In this case 32bit so enter

sudo ./VBoxLinuxAdditions-x86.run

Note:

You will get an error saying “Could not find X.org or Xfree.86 on the guest system”. This is because we are running the server edition and have not got an window manager e.g. KDE or GNOME installed!

=-=-=-=-=
Powered by Blogilo

Running Kubuntu 10.04 in Virtualbox as a guest OS


Before you Start!

First of all I don’t use the Virtualbox version supplied with the Ubuntu distribution, as this version is the open source version and does not support USB devices. Instead I download it from the Virtualbox website http://www.virtualbox.org/wiki/Linux_Downloads.

When you create your virtual computer, do not set Display Settings in Virtualbox to used 3D video Acceleration until after you have installed Virtualbox additions, otherwise when you boot Kubuntu it will hang.

Furthermore, when you do set-up 3D Acceleration, make sure you have at least 24Mb of Video Memory (I use 64Mb), otherwise the Kubuntu splash screen will suffer video corruption.

Installing VirtualBox Guest Additions

Vitrtualbox Guest Additons provides improve performance and make integration much more seamless. Among the features provided by these Guest Additions are mouse pointer integration and arbitrary screen solutions (e.g. by resizing the guest window). There are also guest additions for OS/2 with somewhat reduced functionality.

Under Ubuntu 10.04 it does not install correctly, producing an error message “your system does not seem to be set up to build kernel modules”. The most noticeable problems are:

  • You do not get seamless integration between host and guest
  • Copy and paste between guest and host does not work.

However, some features do work like setting the correct screen resolution!

The fix is to install as follows:

1. From Terminal enter the following commands:

sudo apt-get update

sudo apt-get upgrade

to make sure your guest Ubuntu OS is fully up to date.

2. Now install additional packages:

sudo apt-get install dkms

sudo apt-get install build-essential

Reboot the guest.

3. Once the guest OS has rebooted, go to the Virtualbox Devices entry on the menu bar of the guest OS and select Install Guest Additions… , this will load the Guest Additions ISO CD image. Mount the image in Kubuntu and then open Terminal and enter the following commands:

cd /media/VBOXADDITIONS_3.1.8_61349/

sudo ./VBoxLinuxAdditions-x86.run

The Virtualbox guest additions will now install correctly.

Reboot the guest OS and you will now have a fully integrated Virtualbox guest OS.

One Additional Note:

You may notice that your Kubuntu guest is running relatively slowly (also noticeable on a “bare-metal” install), this is because the Nepomuk desktop Search feature is enabled by default. I’ve yet to understand why someone thought this was a good idea!

Anyway it can be easily disabled by clicking on the icon in System Settings and selecting disable. Instructions can be found at http://www.freetechie.com/blog/disable-nepomuk-desktop-search-on-kde-4-4-2-kubuntu-lucid-10-04/ for those in need more complete instructions.

=-=-=-=-=
Powered by Blogilo

How to Configure the Conky System Monitor


1. Introduction

On Kubuntu I use a plasmoid for monitoring key system performance indicators like CPU Temperature, CPU Performance, Network traffic and memory usage. In GNOME you can use gDesklets http://www.gdesklets.de/ which are supposed to be the equivalent of KDEs Plasmiods. However, a more popular option is to use the light-weight system monitor called Conky http://conky.sourceforge.net/.

My preference is for Conky, lightweight, flexible and powerful. Its one downside is that it can be a pain to set-up unless you are given a helping hand. Hopefully, this blog will be of some assistance!

2. Installing Conky

As well as needing Conky installed, you also need to install lm-sensors http://www.lm-sensors.org/ which are the hardware monitoring sensors.

A. Install LM-SENSORS

To install lm-sensors enter from terminal:

sudo apt-get install lm-sensors

Now configure the sensors by entering:

sudo sensors-detect

Reply yes to all questions including the last one to insert the detected sensor modules into /etc/modules.

Now test what is being detected by entering:

sensors

This will display all detected sensor devices

B. Install Conky

To install Conky enter from terminal:

sudo apt-get install conky

From the root of your home drive, create a file in your favorite text editor called .conkyrc

Note the preceding period in front of the file name which makes this file hidden.

Below is my modified version of the Pengo script. Select the text and copy it into a file called .conkyrc. and save it in the root of your Home directory.

Alternatively, you can download a copy from here , again saving it in the root of your Home directory.

# UBUNTU-CONKY

# A comprehensive conky script, configured for use on

# Ubuntu / Debian Gnome, without the need for any external scripts.

#

# Based on conky-jc and the default .conkyrc.

# INCLUDES:

# – tail of /var/log/messages

# – netstat connections to your computer

#

# — Pengo (conky@pengo.us)

#

# Create own window instead of using desktop (required in nautilus)

own_window yes

own_window_type override

own_window_hints below

# Use double buffering (reduces flicker, may not work for everyone)

double_buffer yes

# fiddle with window

use_spacer yes

use_xft no

# Update interval in seconds

update_interval 3.0

#Maximum Width of Window

maximum_width 320

# Minimum size of text area

# minimum_size 250 5

# Draw shades?

draw_shades no

# Text stuff

draw_outline no # amplifies text if yes

draw_borders no

font arial

uppercase no # set to yes if you want all text to be in uppercase

# Stippled borders?

stippled_borders 3

# border margins

border_margin 5

# border width

border_width 6

# Default colors and also border colors, grey90 == #e5e5e5

default_color FFFFCC

own_window_colour brown

own_window_transparent yes

# Text alignment, other possible values are commented

#alignment top_left

alignment top_right

#alignment bottom_left

#alignment bottom_right

# Gap between borders of screen and text

gap_x 10

gap_y 10

# stuff after ‘TEXT’ will be formatted on screen

TEXT

$color

${color CC9900}SYSTEM ${hr 2}$color

$nodename $sysname $kernel on $machine

${color CC9900}CPU ${hr 2}$color

AMD Athlon(tm) 64 Socket 939 X2 Dual Core CPU 4200+

Total CPU: ${cpu cpu0}%

${color 597DB2}${cpubar}$color

${cpugraph 000000 597DB2}

Core 1: ${freq 1} MHz Temprature: $color ${exec sensors|grep ‘Core0’|awk ‘{print $3}’}

${cpu cpu1}% ${color 597DB2}${cpubar cpu1}$color

Core 2: ${freq 2} MHz Temprature: $color ${exec sensors|grep ‘Core1’|awk ‘{print $3}’}

${cpu cpu2}% ${color 597DB2}${cpubar cpu2}$color

NAME PID CPU% MEM%

${color CCFFFF}${top name 1} ${top pid 1} ${top cpu 1} ${top mem 1}

${top name 2} ${top pid 2} ${top cpu 2} ${top mem 2}

${top name 3} ${top pid 3} ${top cpu 3} ${top mem 3}

${top name 4} ${top pid 4} ${top cpu 4} ${top mem 4}$color

${color CC9900}MEMORY ${hr 2}$color

RAM Used: ${mem} RAM Free: ${memfree}/ ${memmax}

RAM: $memperc% ${color FF6600} ${membar 6}$color

Swap: $swapperc% ${color FF6600} ${swapbar 6}$color

${color CC9900}DISK ${hr 2}$color

sdc5 ${fs_type} (Root): ${fs_free_perc /}% ${color FFFF33} ${fs_bar 6 /}$color

sdc1 NTFS (Data): ${fs_free_perc /media/data}% ${color FFFF33} ${fs_bar 6 /media/data}$color

${color CC9900}NETWORK (${addr eth1}) ${hr 2}$color

Down: $color${downspeed eth1} k/s ${alignr}Up: ${upspeed eth1} k/s

${downspeedgraph eth1 25,140 000000 ff0000} ${alignr}${upspeedgraph eth1

25,140 000000 00ff00}$color

Total: ${totaldown eth1} ${alignr}Total: ${totalup eth1}

Inbound: ${tcp_portmon 1 32767 count} Outbound: ${tcp_portmon 32768

61000 count}${alignr}Total: ${tcp_portmon 1 65535 count}

${color CC9900}LOGGING ${hr 2}$color

${color 339900}${execi 30 tail -n3 /var/log/messages | fold -w50}$color

3. Running Conky

When you are ready, either press <ALT>+<F2> and enter conky or from terminal enter conky. Either way, Conky will run based on the configuration of your .conkyrc file you saved earlier.

4. Customising Conky

Two useful tables detailing the syntax of commands used in the .conkyrc file are available from theConky website

Config Settings http://conky.sourceforge.net/config_settings.html

Config Variables http://conky.sourceforge.net/variables.html

For ACSII colour codes see http://html-color-codes.com/

The .conkyrc configuration file is split into two sections:

  • Section 1 – General Configuration: This is text between # UBUNTU-CONKY line and # stuff after ‘TEXT’ will be formatted on screen
  • Section 2 – System Monitoring Parameters: This is text after # stuff after ‘TEXT’ will be formatted on screen onwards!

Section 1 – General Configuration

These lines detail the general layout, colours, size and behavior of the Conky window. Reference the Config Settings link above for more information.

The elements which I found useful for setting up my display were:

maximum_width 320

Sets the maximum width of the window. Height is variable depending on the number of lines of information you display.

default_color FFFFCC

Sets the default colour of text, in this case to Light yellow, See the ACSII colour code table link above for more colour codes

own_window_colour brown

Sets window background colour, this can be a name of a colour or ASCII colour code

own_window_transparent yes

Makes the background transparent or not (yes or no), depends on the colour of your wallpaper whether this is useful. On the default Ubuntu wallpaper it was unhelpful as the text colours merged with the background.

own_window_type override

Stops the Conky window disappearing when you click on the desktop! Highly recommended!

Section 2 – System Monitoring Parameters

This is laid out in the order it will be displayed in the window. So the first element is

$[color ######} text xyz $color

This sets the colour of the preceding text and the text colour is reverted back to the default colour (set by default_colour in section 1) with $color

In our example each section is grouped, the first one is SYSTEM which is preceded with ${hr 2} this sets the height of the line, this has already been set to light brown by the color command.

If you want to enter text to be displayed as part of the window content, you just enter it as normal e.g. AMD Athlon(tm) 64 Socket 939 X2 Dual Core CPU 4200+. Anything not prefixed with a $ is treated as text.

The horizontal positioning of the text can be done either with the <TAB> key or the <space-bar>. Vertical spacing is done by pressing the <Enter> key.

Using the Config Variables (see link above) you can probably work out the rest of the code in the file, with one exception!

Whilst most CPUs can be read using acpixxxxx variables e.g. acpitemp to read the CPU temperature, AMD CPUs can not be read in this way as they use k8temp-pci-00c3 http://www.mjmwired.net/kernel/Documentation/hwmon/k8temp.

You would have established when configuring LM-SENSORS if the k8temp sensor was being used on your motherboard. As you would have had a result like

8temp-pci-00c3

Adapter: PCI adapter

Core0 Temp: +35.0°C

Core1 Temp: +30.0°C

The lines

Core 1: ${freq 1} MHz Temprature: $color ${exec sensors|grep ‘Core0’|awk ‘{print $3}’}

Core 2: ${freq 2} MHz Temprature: $color ${exec sensors|grep ‘Core1’|awk ‘{print $3}’}

in .conkyrc are used to display the core temperature results which are obtained from the temp1 and temp3 files located in /sys/bus/pci/drivers/k8temp/0000:00:18.3.

I’ve now explained the essentials necessary to getting started in creating your own customised Conky display. Hopefully, the rest of the code in .conkyrc should now be more meaningful.

TIP: When making code changes, copy and paste the code you wish to change below the old code. Modify the pasted version, save and reload Conky from terminal.

5. Automatically Running Conky at Boot

If you want to automatically load Conky every time yo run Ubuntu, then you will need to write a short script to delay Conky starting immediately on boot, otherwise you will get a shadow behind your Conky Window.

The script looks like

#!/bin/bash

#Conky start-up delay script

sleep 20 && conky;

A copy of the script can be downloaded from here.

The sleep 20 parameter causes the script to wait 20 seconds before conky is started. I’ve found on my PC that a 10 second delay is sufficient.

I would recommend you create a scripts directory in the root of your home drive and save it in it with a meaningful name like conky_delay_start.

Having created and saved your script, you now need to change it from a plain text file in to an executable text file.

From the scripts directory enter

chmod 755 conky_delay_start

to make the script executable.

Now to get the script to run on boot-up, add it to Preference > Start-up Applications like so

Restart your PC and Conky will load automatically.

=-=-=-=-=
Powered by Bilbo Blogger

How to do a Frugal Puppy Linux 4.3.1 Install to a new Hard disk


Whilst I love Puppy Linux for its speed and ease of use, installing it as a Frugal install to a new hard disk requires a disproportionate number of ‘hoops’ to jump through to get the distribution to work correctly.

The following tutorial attempts to take you through the install, hopefully without the pain!

A. Boot of the Puppy Linux 4.3.1 ‘Live’ CD

B. Run GParted to partition the hard disk

  1. Right click on the desktop, from the displayed menu choose System > GParted Partition Manager
  2. GParted will run.
  3. Select the empty hard disk and create a New EXT2 partition, label it Puppy
  4. Exit GParted once the partition is created

C. Install GRUB Boot Loader

  1. Right click on the desktop and from the menu choose System > GRUB Boot Loader
  2. Select Simple, click OKay and follow the on screen instructions, specifying the disk you wish the boot loaded to be installed to, normally /dev/sda1, but this may vary depending on your PC.
  3. Choose option 3 (MBR Install) when asked where to install GRUB. Unfortunately for a new hard disk without an existing boot loader, choosing option 1 will leave you with a non boot-able hard disk.
  4. GRUB will install and you will get a success screen. Click OKay.
  5. Now because GRUB can be an absolute pain, especially if you are new to using it, reboot Puppy Linux (choose DO NOT SAVE) and remove the Live CD. You should get the default GRUB boot menu on restart.
  6. If successful, reboot the PC off the Puppy Linux ‘Live’ CD.

D. Install Puppy Linux

  1. Right click on the desktop and from the menu choose Setup > Puppy universal installer
  2. Select Internal (IDE or SATA) hard drive and follow the on-screen instructions.
  3. Select the hard disk you wish to install to, in this example it is SDA, click OKay.
  4. The install should see your partition created in B above, If so click the icon to the right of Install Puppy to sda1.
  5. You will be given with a warning message confirming your selection. If happy, click OKay and follow the instructions.
  6. When asked on the type of install, choose FRUGAL, then follow the on screen instructions, accepting the defaults.
  7. Once complete you will be displayed a window showing the settings required for GRUB. Click OKay to the message, you will get another window confirming installation is complete. Click OKay

E. Configuring GRUB

  1. Run Edit (Geany) and open the configuration text file /tmp/NEWGRUBTEXT.
  2. On the desktop right click on disk SDA1 and select Puppy Drive Mounter. Mount the drive.
  3. Navigate to the boot/grub folder and find the menu.lst file. This file contains the GRUB configuration. Click on it to open it in Edit.
  4. Find the comment titled #Linux bootable partition config begins, and the corresponding comment #Linux bootable partition config ends. Delete all text between these two comments.
  5. Paste the text in /tmp/NEWGRUBTEXT into the space created in 4 above.
  6. Save menu.lst, close Edit and quit Puppy Drive Mounter.

F. Re-Boot and test

  1. Reboot Puppy Linux
  2. As you have booted off the ‘Live’ CD, you will be asked whether you want to <SAVE TO FILE>, select this option. Then select all the defaults, in subsequent menus.
  3. At the end Puppy will reboot, remove the CD.
  4. The PC should successfully boot into Puppy Linux. It will then allow you to “localise” the installation. Once localised, reboot.
  5. You will again run through the <SAVE TO FILE> options as in F.2. repeat. This will be the last time you will be asked for these settings.
  6. Puppy Linux is now installed.

=-=-=-=-=
Powered by Bilbo Blogger