Why Madsonic rather than Subsonic?
Madsonic is a fork of Subsonic the excellent cross platform web based media streamer which is free to use for media streaming but which has some ‘premium features’ only available by a low cost subscription.
Of particular interest to me was the ability to record, store, manager and stream my podcast subscriptions as there is nothing else similar which provides a web interface and cross platform APPs for mobile devices which works in NAS4Free. The Podcast capability comes under the Premium features of Subsonic. Madsonic being a fork of Subsonic works in a similar way to Subsonic, except it is truly free and Podcast management is included and runs exceptionally well in a BSD Jail in NAS4Free.
Configure the Jail for Madsonic
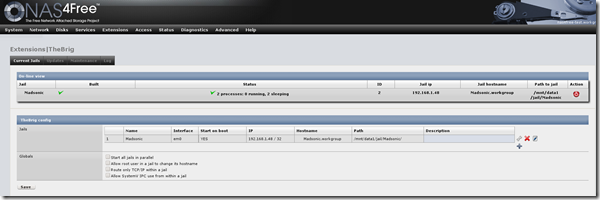
Click on the Current Jails tab to display the following
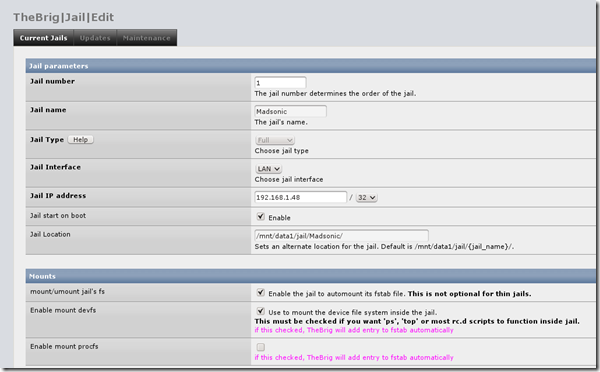
We are now going to add a jail for Madsonic, click on the + sign in the TheBrig config panel and configure as per the screenshot below
Set Jail name to Madsonic
Type to Full
Allocate a static IP address for the Jail, one which is outside the DHCP range of your network.
Set Jail to Start on Boot to Enable
Leave Jail Location blank so it defaults to /mnt/DISK1/Jail/Madsonic/
In Mounts check the Enable the mount devfs checkbox
In Installation Source check the Official FreeBSD Flavour checkbox
Once done save the setting by clicking Add
In the Current Jails screen, click Save
Start the Jail Subsonic by clicking on the Green start button under Action.
Your Jail should then start and the resulting screen should look similar to the screenshot below
The jail is now configured for Madsonic.
Accessing the Jail
SSH into the Subsonic Jail by entering from Terminal
e.g. ssh root@192.168.1.55
Enter the root password and you should be taken to a command prompt for NAS4Free!
enter
jls
this checks your new jail, you should see something like this
Based on the above output, enter the jail by entering
jexec 2 csh
Now configure the server with the necessary packages
Installing Lame and Supporting Packages
As we are using a i386 for this tutorial so I will download mine from ftp://ftp.freebsd.org/pub/FreeBSD/ports/i386/packages-9.2-release/Latest/
If you are using AMD 64 Bit then download from ftp://ftp.freebsd.org/pub/FreeBSD/ports/amd64/packages-9-stable/Latest/
The following command sets the location where the packages are going to be downloaded:
setenv PACKAGESITE ftp://ftp.freebsd.org/pub/FreeBSD/ports/i386/packages-9.2-release/Latest/
Now start installing the packages required by Madsonic:
pkg_add -v -r xtrans
pkg_add -v -r xproto
pkg_add -v -r xextproto
pkg_add -v -r javavmwrapper
Install Lame 3.99, which by default is not provided as a package in FreeBSD due to licensing issues. However, it can be installed by either pre-built package which can be installed as follows:
pkg_add -v -r http://denieru.no-ip.org/filecache/subext/lame.tbz
Note: at time of writing this site had been down for a number of days although it is now back up.
alternatively you can download the source code and compile it for FreeBSD by entering the following:
pkg_add -v -r gettext
pkg_add -v -r gmake
pkg_add -v -r libtool
pkg_add -v -r nasm
cd /tmp
fetch http://downloads.sourceforge.net/project/lame/lame/3.99/lame-3.99.5.tar.gz
tar xvzf /tmp/lame-3.99.5.tar.gz
cd lame-3.99.5
./configure
make
make install
Now add the remaining packages:
pkg_add -v -r flac
pkg_add -v -r ffmpeg
pkg_add -v -r openjdk7
Installing Madsonic
Create folders and download and extract Madsonic Standalone v5.1.x
mkdir /var/madsonic
mkdir /var/madsonic/transcode
mkdir /var/madsonic/standalone
cp /usr/local/bin/lame /var/madsonic/transcode/
cp /usr/local/bin/flac /var/madsonic/transcode/
cp /usr/local/bin/ffmpeg /var/madsonic/transcode/
cd /tmp/
fetch http://madsonic.org/download/5.1/20140927_madsonic-5.1.5150-standalone.tar.gz
Assuming the above installed successfully, enter the following to start Madsonic manually:
cd /var/madsonic/standalone
tar xvzf /tmp/20140927_madsonic-5.1.5150-standalone.tar.gz
chmod 777 *.*
Assuming the above installed successfully, enter the following to start Subsonic manually:
sh /var/madsonic/standalone/madsonic.sh
Your should see the process start as above.
It takes about a minute for Madsonic server to start up, in the meantime go to your web browser and enter the ip address you assigned to your subsonic Jail.
Madsonic runs on port 4040 so the url you need to enter would be your-jail-IP-address:4040. e.g., 192.168.1.49:4040.
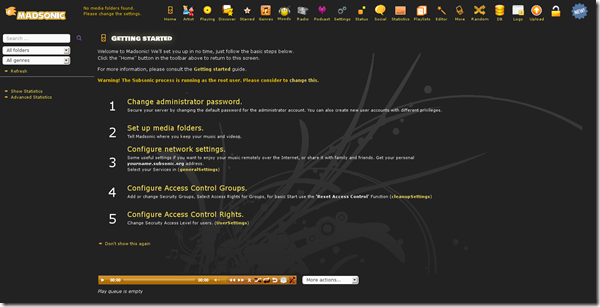
The default Madsonic username and password are both admin and all being well once logged in you should see the following:
We can now need to make the above script (sh /var/madsonic/standalone/madsonic.sh) run automatically whenever the NAS4Free server starts.
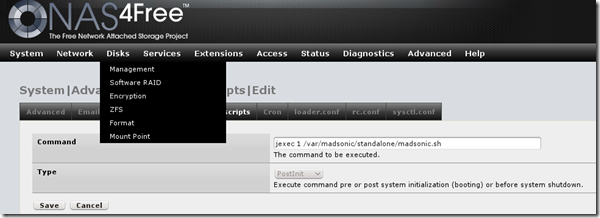
From NAS4Free go to System > Advanced > Command Scripts
Click on the ‘+‘ sign to add an additional command script as follows:
Command: jexec 1 /var/madsonic/standalone/madsonic.sh
Type: PostInit
Save and then reboot your server.
If all is well, you should be able to login to subsonic as before on port 4040.
Accessing your Music stored in NAS4Free from within your Madsonic Jail
Jails separate your installed applications like Subsonic from your NAS4Free server. The downside is that they are isolated from your NAS servers storage and in the case of Madsonic, your music.
To get Madsonic to see your music you need to setup your Jails fstab so it mounts your music directory on your NAS4Free server locally within the Jail.
To do this go to your Jail’s settings Extensions > TheBrigg and then select the settings for your Madsonic Jail.
You will need to create an Fstab entry to mount your NAS4Free directory to a mount point within your jail.
If you wish to find more about Fstab see https://www.freebsd.org/cgi/man.cgi?query=fstab%285%29&sektion=
Below is the configuration for my Madsonic Jail
/mnt/data1/Music /mnt/data1/jail/Madsonic/mnt/music nullfs rw 0 0
The above fstab entry can be broken down as follows:
/mnt/data1/Music – This is the directory where my music is located on my NAS4Free server
/mnt/data1/jail/Madsonic/mnt/music – This is mount point WITHIN my Madsonic Jail.
nullfs rw 0 0 – The important bit is rw which stands for Read/ Write, which you need in order to upload music to your NAS4Free music directory via Madsonic. The alternative option is ro which is Read Only which does what it says!
To setup this up do the following:
Identify the path to your music on your NAS4Free server e.g. /mnt/data1/Music
Create a directory via SSH (e.g. music) in your Madsonic Jail’s mnt directory where you wish to mount your NAS4Free Music directory /mnt/data1/jail/Madsonic/mnt/music. To create a directory called music within the mnt directory use the command mkdir /mnt/music.
Now put all the above (from 1 and 2) together along with nullfs rw 0 0 and place your Fstab entry into your NAS4Free Madsonic Jail Fstab as in the screenshot and example above.
-
Identify the path to your music on your NAS4Free server e.g. /mnt/data1/Music
-
Create a directory via SSH (e.g. music) in your Madsonic Jail’s mnt directory where you wish to mount your NAS4Free Music directory /mnt/data1/jail/Madsonic/mnt/music. To create a directory called music within the mnt directory use the command mkdir /mnt/music
-
Now put all the above (from 1 and 2) together along with nullfs rw 0 0 and place your Fstab entry into your NAS4Free Madsonic Jail Fstab as in the screenshot and example above.
Save and Apply the changes and reboot your NAS4Free server.
Once the NAS4Free server has restarted, test that the mount has worked. SSH back on to your Madsonic jail, navigate to your mount point directory e.g. mnt/music by entering cd /mnt/music and then enter ls to list the contents. If the mount has worked you should see the contents of your NAS4Free Music directory within the jail.
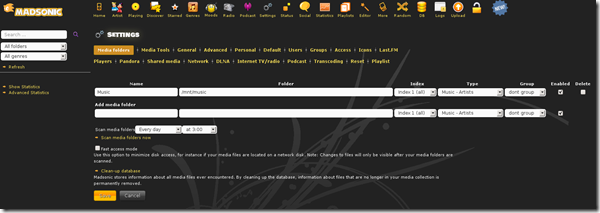
Login to Madsonic and go to Settings and point this to the mount point you created in step 2 above.
Below is how it should look in Madsonic.
If you wish to store your Podcasts in a different location e.g. /mnt/data1/Podcasts then you will need to add an additional fstab line as follows:
/mnt/data1/Podcasts /mnt/DISK1/Jail/Subsonic/mnt/podcasts nullfs rw 0 0
The format is exactly the same as before.
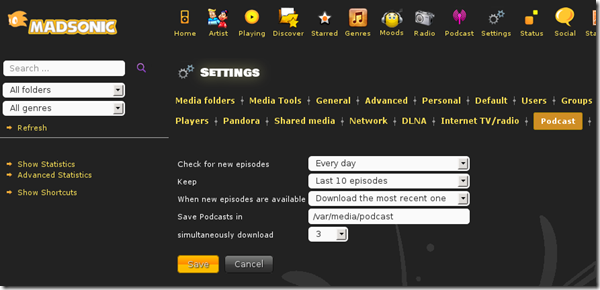
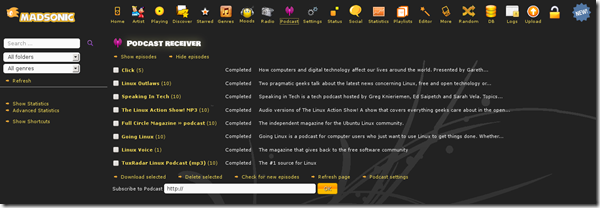
In Madsonic we now need to point it to the Podcast directory, by selecting Podcast from the menu, the following screen will be displayed
Click Podcast settings
Change the Save Podcasts in directory location to the podcast directory you created earlier e.g. /mnt/podcast
Click Save
Madsonic is now installed and running under NAS4Free to deliver Music streaming and Podcasts. All you need to do is add your music and subscribe to your favourite podcast RSS feeds, this is what mine look like.







Hello!
Thank you very much for your detailed instructions.
I’ve followed everything you wrote, but my flac won’t played in Madsonic (and also subsonic). MP3 plays fine, but flac won’t. Can you give me please a hint?
Thank you very much!
Best regards, Peter
Hi Peter,
I had this issue too. Resolved by compiling FFMPEG (with liblame support), FLAC and LAME by myself and everything worked just fine. After that I realised that TRANSCODE PACK can be downloaded directly from http://beta.madsonic.org/pages/download.jsp, so compiling is not necessary, just copy those files to /var/madsonic/transcode. Enjoy.
Hello,
Thank you so much for taking the time to do these tutorials!
I do have a question about mounting external music in jail from nas4free.
Does the music have to be in the same drive? I followed your example including the Fstab entry but I have not been able to mount music from my library into Madsonic.