If you’ve used Symantec Ghost http://en.wikipedia.org/wiki/Symantec_Ghost or Acronis True Image http://en.wikipedia.org/wiki/Acronis_True_Image then you will know how useful they are for making images of computer hard disks. Great for backing up all your data or even for disaster recovery. The down side is they are both expensive programs to buy and for us Linux users, not free (as in beer or as in speech).
Clonezilla http://en.wikipedia.org/wiki/Clonezilla is in my view as good as, if not better than, the closed source competition and is highly regarded by IT professionals. I use Clonezilla regularly to image PCs before doing a distribution upgrade and I image both Linux and Windows partitions. I also use it for backing up hard disk and for migrating data between disks. For the latter I use Clonezilla along with GParted Live http://gparted.sourceforge.net/livecd.php. to resize partitions after the cloned image is restored to a new (larger) hard disk.
Because it runs from a ‘live’ CD (ISO image obtainable from http://tinyurl.com/c2myn8) and will read most hard disk formats including NTFS, Clonezilla is OS agnostic. It can backup at partition level to another hard disk or to a USB hard disk, and as we shall see it can also back up to a network share, or in our case to a FreeNAS storage server*.
*See my earlier blog posts on installing and configuring FreeNAS http://preview.tinyurl.com/2eglwrm and http://preview.tinyurl.com/2978jqv .
Cloning a Hard Disk
Insert the Clonezilla ‘Live CD’ and boot the PC off the CD.
The following menu will be displayed.
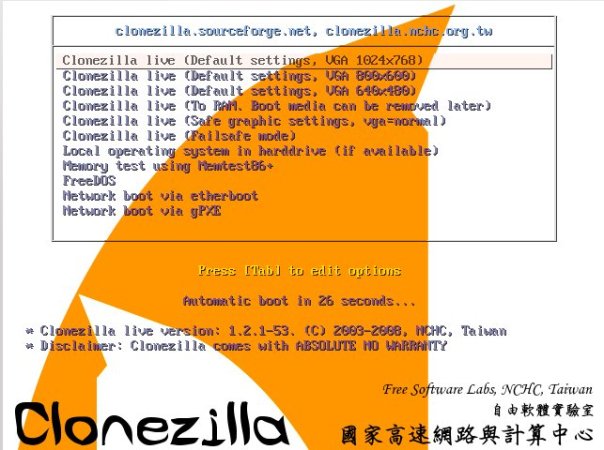
Select the default option, and press the Enter key. Clonezilla will boot.
Eventually displaying the following “choose language” screen.

Select your language, then press the Enter key.
The “configuring console data” screen will appear
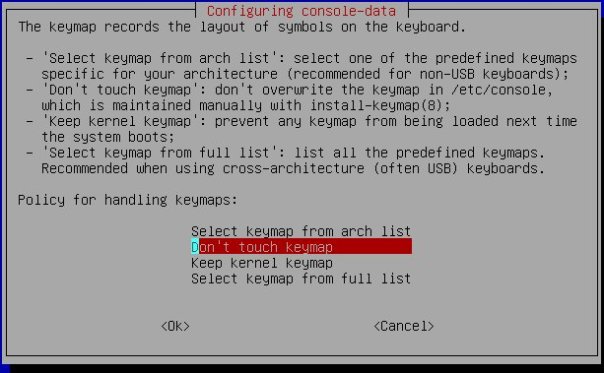
Accept the default and press the Enter key.
You will now be given two options, as we don’t want the command prompt, choose the default option Start Clonezilla and press the Enter key.
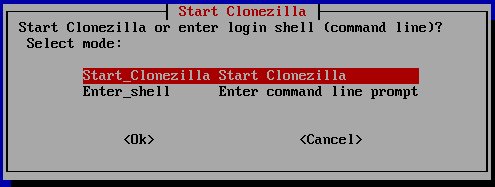
You will now get a screen asking if you wish to work with images or clone from one physical disk to another (duplicate). Choose the device-image option and press the Enter key.
You will now be asked where you are going to save the image to, as FreeNAS runs Samba, we will choose samba_server.

Press the Enter key.
Note: If you are not using FreeNAS, but are instead saving to a Windows or Linux Samba share, then you would still select this option.
You will now be asked to set-up a network IP address for Clonezilla so that it can connect to the network share.

As we have a DHCP server (in my case it is my DSL router) I’m going to select dhcp.
Press the Enter key to continue.
Once Clonezilla has obtained an IP address from the DHCP server, you will be asked for the IP address of the Samba server which contains the file share you wish to connect.

In my case the address is of the FreeNAS server is 192.168.1.252, yours is probably different.
Once you have entered the address, press the Enter key to continue.
You will be asked to provide the domain name, if you don’t have a domain name set you can leave this blank. In my case mine is called workgroup.

Press the Enter key to continue.
You will now be asked for a username to connect to the FreeNAS server, the offered name is Administrator. Replace this with a valid username for your network share. In my case I have a username of fernsm1 set-up on my FreeNAS server.

Press the Enter key.
You will then be asked for the destination directory, and will be offered the directory name of /images. Replace this with the name of your network share and the directory within that share you wish to save the image in to.
In my case this is /NASDisk1/images, remember that Unix and Linux operating systems are case sensitive. So if the share name is in upper case, make sure you write it in upper case!
UPDATE: 15/12/10
You can also enter the share name. So in my example the Samba/ CIFS share name is /DiskImages and you just enter what I’ve put in bold text. You may find this more reliable than specifying the actual path.

When done, press the Enter key.
The following screen will be displayed. This is a summary of what you have entered so far, and warns that you will now be asked to enter the password.

Press the Enter key.
At the bottom of the screen the following will appear.

The above is the command string being used to connect Clonezilla to the share.
Type in your password and press Enter.
If the following will be displayed, this means that Clonezilla has successfully connected to the FreeNAS server/ network share. if you get an error message at this stage, check the share name and/ or username/ password and start again.
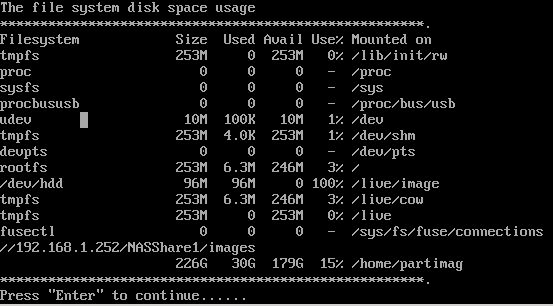
Press the Enter key.
You now need to select the mode you wish to run Clonezilla in, a list of choices will be displayed

As we are creating an image of the PC, we will use the savedisk option. Select and press the Enter key.
You will then be asked for a name to give the image. By default Clonezilla gives a unique file name based on the date and time. When you have give a file name for the saved image, press the Enter key to continue.

You will now be asked to select the hard disk on the PC which you wish to clone. If you only have one hard disk, just press the Enter key. Otherwise use the cursor keys and space-bar to select/ deselect a disk..
You will now go through a number of screens offering “advanced extra parameters”. Accept the defaults on all.
Once completed, Clonezilla builds a command string should use wish to use it again without having to go through all the menus. In our case it should look similar to the following

Press the Enter key to continue.
Clonezilla will now start the cloning process, telling you what it is about to do and giving you the option to cancel.

If you are happy with the summary it provided, press y followed by the Enter key to continue.
Clonezilla will check the file system of the source PC to ensure okay and determine the cloning method it will use before it starts to clone the hard disk. If satisfied, it will then commence the cloning process.
Once the disk has been cloned, you will see something like this
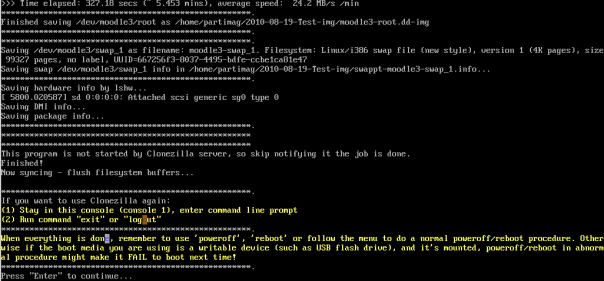
Congratulations, you have successfully cloned your PCs hard disk to your FreeNAS network share.
Pressing Enter, will give you an options menu:
- Poweroff
- Reboot
- Enter command line prompt
- Start over
Warning: The default is option 2.
=-=-=-=-=
Powered by Blogilo
Great tutorial.. just did both my daughters minis (running linux) via PXE boot 🙂 Got any way to pass the mounting and login info through append?
I’m currently working on setting up Clonezilla Server, this could be a Virtual server and using FreeNAS server as the image store. This is in fact how I’m configuring it using Virtualbox.
This has the advantage that the clients can PXE boot off the Clonezilla server and the image is broadcast to multiple PCs but at the same bandwidth as cloning just one PC. Furthermore, you can still use the clonezilla images with the Live Clonezilla boot CD.
Hi Blogilo,
Thank you for this post. It really helped me setup my FreeNAS server. However, I am having an issue doing cloning using Clonezilla. I am using FreeNAS 8. I have desktop machines that need to cloned for backup purposes. I was able to come to second to the last image without any problem. So here is how I have come to that point. it started to give me home/parimag/ mount point not found issue. so I turned on CIFS and that let me share folders, created /mnt/Volume-1 sharing under windows section and also I created home/partimag/ manually in windows share section. Now after doing the cloning seem to work fine for the bios partition, but for the rest of the partition it gives me a message CIFS VFS: NO response to cmd mid 2246 and on the subsistent lines I can see it is not writing.
Any thoughts?
thanks
Try disabling Opportunistic Locking, there is a blog post (not mine!) posted at http://blog.dhampir.no/content/cifs-vfs-no-response-for-cmd-n-mid
BTW Blogilo is actually the blogging software I use not my name.
However, as long as it is not offensive you can call me what you like.
Mark
I am sorry for my mistake Mark. I actually installed version 7.2 and that is working fine. I will install version 8 and try it again. But I want to thank you for your suggestion.
Thanks,
Yoseph
Free domain name when you sign up more than 12 months, cheap web hosting avaliable for bloggers, managed vps Just USD 35.99/Mo, Start Your own web hosting company today. visit http://www.synwebhost.com to get more details
Hello. Is it possible to restore the same image, from a nfs or samba share, to multiple boxes at the same time? I have try clonezilla server for this purpose but always have problems because the image is of a dual-boot win/linux box.
would it not be easier to use an offsite backup?
Do you mean going around with an external drive, restoring one by one? No. I was thinking about doing some 10 copies of the live CD then booting them almost at the same time and they would restore the image from the share almost simultaneously.
i like your post…. 🙂 NIce work…. Can you help to write a script to automate all these steps in a single click….
Magnificent beat ! I wish to apprentice at the same time as you amend your website, how can i subscribe for a blog website? The account aided me a applicable deal. I were tiny bit familiar of this your broadcast provided brilliant clear idea
Very good intell. Just set up a NAS running Windows Storage Server, & testing it with a MacBook. You’re instructions were right on the spot!
Hi I’m looking at employing freenas and clonezilla in a laptop repair workshop environment, with sysprepped images for the various models stored on the NAS. What transfer speeds do you get over the Wire, we currently manually transfer images over usb2, and it only gets 20meg a second, so hoping gigabit ethernet out to be alot faster
i run a clonzilla server with a single wdblack 3tb drive and i get about 5.75 gb/ min transfer rate. Lesser hard drives got about 3.5. Uploading an image is slower since there is compression taking place.
Hello my name is Andre, I have a multiple folder present on NAS Qnap. Currently i have a litle menu on usb pen boot. This menu have a five submenu LABEL where i do forward the image for the their folder that i want. But I need a menu more automatic i want a five submenu whit a global variable and when i select a folder where i want to save a image replace in code
Example
label STORE # MENU DEFAULT # MENU HIDE MENU LABEL Store # MENU PASSWD kernel /live/vmlinuz append initrd=/live/initrd.img boot=live config noswap nolocales edd=on nomodeset noprompt ocs_prerun=”mount -t cifs -o user=admin,domain=domain.net 172.28.64.141:/Images/%FOLDER% /home/partimag” ocs_live_run=”/opt/drbl/sbin/ocs-sr -u -q2 -c -j2 -z1 -i 2000 -p true savedisk ask_user sda” ocs_live_extra_param=”” ocs_live_keymap=”” ocs_live_batch=”no” ocs_lang=”en_US.UTF-8″ vga=788 toram=filesystem.squashfs nosplash TEXT HELP Store an image to the NAS ENDTEXT
Excellent tutorial Thank you!!!
I know this is veery old!! but thanks. You are the only guy who deigned to write this update
UPDATE: 15/12/10
You can also enter the share name. So in my example the Samba/ CIFS share name is /DiskImages and you just enter what I’ve put in bold text. You may find this more reliable than specifying the actual path.
This put an end to days of headache trying to troubleshoot cifs connections.
Thanks
I’ve been using this method for years–one of the strongest features of Clonezilla in my opinion. 🙂
Thank You, Thank You, Thank You!!!
I have spent nearly 3 days trying to get this to work to backup my old laptop before replacing the Linux OS with a newer version of PeppermintOS 10. I was able to get a backup of the /home directory, but wanted a full image backup to have on hand just in case there were issues with the new version so I could quickly roll back without a lot of fuss. I watched countless videos, but your video provided exactly what I needed to get the Clonezilla to actually connect and begin backing up to a Samba Share I created on another Linux PC. The difficulty I was having was pointing the backup image to the storage location that was on a 2nd new hard drive in the PC. I had been trying to use the share name, but for some reason, things just never connected correctly, but I could open my file manager on the laptop and navigate directly to the targeted storage area on the Linux box without any issues. Anyway, we are now about half way through what appears to be a 4 hour backup of this old PC’s 250GB Hard Drive and things are going well. It’s a little slow because of the 100MBit internal network card, but it is definitely working. Thanks again for your instructions with pictures and video. I’ll be permanently bookmarking this one.