In Part 1 we installed our FreeNAS Server on an old PC gathering dust in the corner of the office. In my case this is a Pentium III 800MHz Compaq Deskpro EN tower, maxed out with 512Mb of RAM and a Promise PCI SATA/ IDE card to manage large 250Gb+ hard disks. For FreeNAS this is quite a high spec PC as it can run with 256Mb RAM and a Pentium II CPU!
In Part 2 we are going to configure this PC into to a fully fledged NAS Server.
Configuring FreeNAS Server
Changing the Admin Password
This is the first thing we need to do, now the server is up and running.
From the FreeNAS menu bar, click on System > General and select the Password tab. Your old password is already entered for you, so enter your new password (twice) in the fields provided.
When done, click Save.
The following message will be displayed.

Note:
If you wish you can also change the username from Admin to something else, this can be done from the General tab under WebGUI section. In the Username field enter the name of the username you wish to use, go to the bottom of the page and click Save.
Set-up the File Sharing Service (CIFS/ SMB)
From the FreeNAS menu bar, click on Services > CIFS/ SMB.
Note:
SMB http://en.wikipedia.org/wiki/Samba_%28software%29 and CIFS http://en.wikipedia.org/wiki/Cifs allow Unix/ Linux, Apple OSX and Windows PCs to access the share.
Tick the Enable check box (top right of screen)

Scroll to the bottom of the screen and click on Save and Restart.
The screen should refresh and you should see

Adding the Disk(s) to FreeNAS
From the FreeNAS menu bar, click on Disks > Management, the following screen will be displayed

As we are adding a disk, click on the + symbol on the right.

Now from the Add window, click on the drop-down in Disk field, this will display all your “disk” devices including removable media, like my DVD ROM drive. FreeBSD (Unix) labels disks differently to Linux. ATA type disks (IDE/ SATA) are prefixed with ‘a’, followed by ‘d’ short for disk, CD devices are followed by ‘cd’. A number is allocated for each device, and the device information read to help you identify which device you are selecting.
In the above example, ad1 is a 8Gb IBM hard disk of which 128Mb was allocated to FreeNAS in part 1, the rest is available to use. The remaining ad devices are a 250Gb Hitachi SATA hard disk (ad6) and a 300Gb Maxtor IDE hard disk (ad8). We will select ad6 as our first disk to mount.
As I don’t wish my disks to spin when not in use (it’s good to try to save energy when setting up a NAS box), I’m going to set the Hard disk standby time to 10 minutes.
I’m also going to activate S.M.A.R.T. Hard disk monitoring as I will not be using a software RAID disk in this NAS configuration as I want to maximise my available disk space. Tick Activate S.M.A.R.T monitoring for this device.
Click Add to save the settings, you will be returned to the Disk Management screen. An information box will advise you to click Apply to apply the changes to the disk. Once clicked, the disk status will change from initialising to ONLINE.
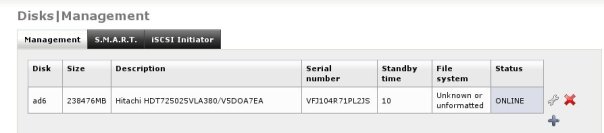
Under the File System column, you will notice that the disk is showing as unformatted.
Format the Disk
To format the disk, from the FreeNAS menu bar select Disk > Format.
In the Disk field, select the disk you wish to format, in our example only one is listed because only one disk has been added to FreeNAS.
Give the disk a Volume label, this will be used to identify the disk. In our example, I’m calling this disk NAS1.
The completed screen should look like the following
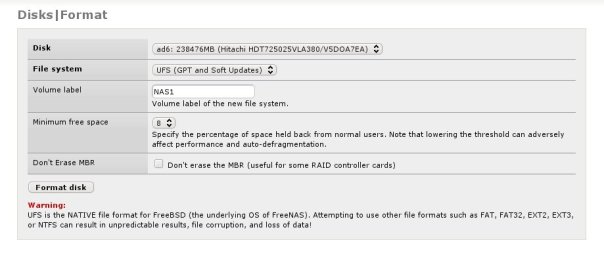
As you will notice, I’ve headed the warning at the bottom of the screen and have kept the default UFS (Unix File System). You are now ready to format the disk, so press Format disk. You will be asked to confirm, click Okay.
The disk will be formatted and the lower half of the screen will fill the output of the format command (sets of random numbers). Once formatting has completed the word Done! will appear at the bottom of the list.
From the FreeNAS menu bar, click on Disks > Management, under the File System column, you will notice that the disk is now showing a UFS file system.
Mounting the Disk
Although the disk is online, and formatted it is not available to use as it has yet to be mounted. To mount a disk from the FreeNAS menu bar, click on Disks > Mount Point.

Click on the ‘+‘ sign on the far right, as you are going to add a disk. In the Mount Point Add screen, in the Disk section under Settings, select the hard disk you have just formatted. Now give it a Mount point name, I’m going to call it in this example NASDisk1.
If you wish you can also give it a description, in the description filed below.
Likewise, you can set the normal Unix/ Linux Read Write and eXecute permissions for different groups of users, set the owner, default is always root (administrator), and add the disk to a group. For our purposes, we will leave this as per the defaults.
See completed screen below

Click Add, you will be returned to the Mount Point Management window, where the disk will show a status of initialising. Click Apply Changes, the disk will be mounted and the status will change to OK.
Whilst in the window, you may notice there are two other tabs, Tools and Fsck. The former allows you to mount or umount (unmount) a disk and the latter which stands for File System Check is used to check the consistency of the Unix/ Linux file system, similar to chkdsk in DOS/ Windows.
Sharing the Disk
From the FreeNAS menu bar, click on Services > CIFS/ SMB. Click on the Shares tab, we are now going to share the disk so that it is available to access over the network.
Click on the ‘+‘ sign on the far right, as you are going to add a share.
Give a Comment for the share, this can be anything useful.
Give the share a name e.g. NASShare1.
In the Path field, you are now going to create the share. Click the browse button, a window similar to the following should appear
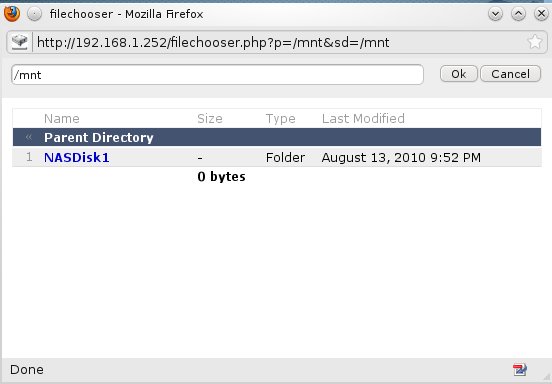
NASDisk1 is the mount point for the disk we created earlier. Click on it to select, and then click Okay.
The resulting screen should look something like

Click Apply changes.
You have now created your share on the network.
Accessing the Share over the Network
Now browser the network for the samba share using your file manager:
For Linux
In KDE Dolphin, or in GNOME Nautilus you can either browse your network for the Samba share or enter smb://192.168.1.252/NASShare1/ .
It is also possible to automatically mount a Samba share, for more information see https://help.ubuntu.com/community/SettingUpSamba .
For Windows
Open Windows Explorer or Start > Run and enter \\192.168.1.252\NASShare1.
As we have not set-up security on the share, no password is required, and therefore you should be able to browse you FreeNAS share, add and remove files.
You have now set-up your FreeNAS server Samba share.
Setting up a User Account to Remotely Access the Share
Whilst you can get away with having no user account set-up for remote access to the share, some programs expect a user account. One of them is Clonezilla, which I will be using in my next blog to image up a PC to the FreeNAS server.
To set-up the user account
From the FreeNAS menu bar, click on Access > Users and Groups. Click on the ‘+‘ sign on the far right, as you are going to add a new user.
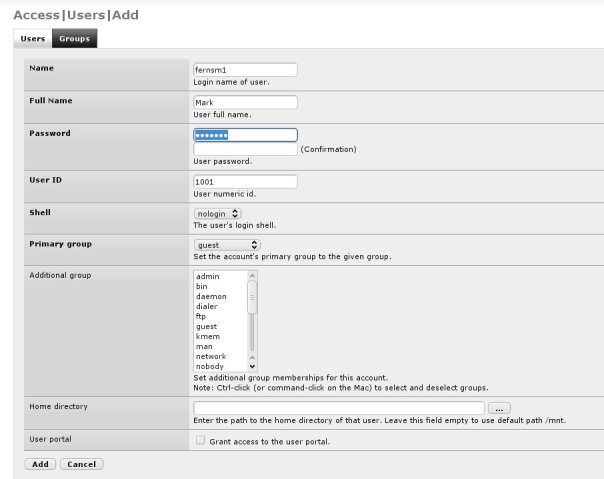
In the Name field, enter the login name for this account.
In the Full Name field either give the users full name or a description of the purpose of this account
In the Password field, enter a password, (twice)
When complete click Add.
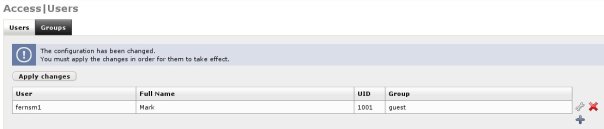
The above screen will appear, click Apply changes. You have now created an account to remotely access the share.
In Part 3, I will be looking at configuring some of the other more advanced features available in FreeNAS, including setting up a software RAID and configuring FreeNAS as a Bittorrent server.
=-=-=-=-=
Powered by Blogilo

Hello Gary,
Great tutorial. I went through the 2 tutorials and managed to setup my freenas without issue. I’m looking forward to Part 3. Thank you so much.
I did consider creating a PART 3 but then discovered that Freenas 7 was no longer being developed, being replaced by version 8. As version 8 was feature poor and hardware heavy I’ve decided it was unsuitable for home users. At the time with no future development likely after the FreeNAS name was acquired by iXsystems for FreeNAS 8 it was decided to cease developing the FreeNAS 7 blog.
However, it now appears that FreeNAS 7 lives on under the new name of NAS4Free. It remains opensource and is now at version 9!
The NAS4Free Website is http://www.nas4free.org/ and the good news is that I will cover NAS4Free in a future post, probably taking the same approach as FreeNAS 7, but will include PART 3.
On a related subject I’m also considering setting up an Amahi http://www.amahi.org/ server, which is similar to NAS4Free but runs under Ubuntu rather than Free BSD.
One of the reasons for not covering Amahi earlier was that those nasty Apple people were trying to sue the company because of their app store name http://blog.amahi.org/2011/06/21/apple-hits-amahi-with-a-cease-and-desist-wait-what/ .
Talk about Apple behaving like a spoilt brat in the sweet shop!
The Initial blog post will be Upgrading from FreeNAS 7 to NAS4Free 9
Nice…
I’ve been using FreeNAS for about 8 months and I’m extremely satisfied with my choice between the other open sources available. After using the commercial networking products for over 20 years, I’m conditioned to constantly check my box to ensure it’s still running efficiently. Coming across information like this assured me that I configured it appropriately eight months ago and it is still running efficiently. I also look forward to your next published piece. Thanks.
great tutorial, really!! Thank you for all the work!
I’m thinking of using 3 x 2TB USB drives with version 0.7.2 – are such large drives supported?? I just didn’t find that.
Thx a lot!!
I think the limiting factor will be the USB controller in your server. The FreenNAS hardware compatibility guide can be found at http://freenas.org/freenas_users_hardware. If not check out the FreeBSD hardware list http://www.freebsd.org/releases/7.2R/hardware.html or ask on the relevant forums.
The UI seems to have been updated a bit from this guide. You now have to manually start the CIFS service on a separate page before the share will work. Just burned 2 hours trying to get it working before finding that.
It’s perfect time to make a few plans for the future and it is time to be happy. I have read this put up and if I may just I wish to counsel you few interesting things or suggestions. Perhaps you could write next articles referring to this article. I desire to learn even more things approximately it!
Hi! I know this is sort of off-topic but I needed to ask.
Does running a well-established blog like yours require a lot of work?
I am brand new to running a blog but I do write
in my journal on a daily basis. I’d like to start a blog so I will be able to share my experience and feelings online. Please let me know if you have any kind of recommendations or tips for new aspiring blog owners. Thankyou!
Yes blogs do they do use WISIWYG, for WordPress you can either use their editor or a 3rd party one like the ScribeFire plugin for Firefox http://www.scribefire.com/. This is what I use.
I agree, but the site is calld MyLinuxRamblings.
Search engine optimisation is a “black art”, a lot of it is to do with getting other sites to link with your post, although titles do have a role in this it is not a major one.
However, thank your for your concern, and I will consider this for future posts.
I’m also getting a lot of spam remarks, generally they make little sense but as English is not everyone’s first language it can sometimes make identifying spam a bit difficult. I’ve not tried it but take a look at http://wordpress.org/extend/plugins/spam-free-wordpress/
Hi i’m a first timer here. I found this site and I find
it genuinely useful. I really hope to provide something back and aid others much like you helped me.