In Part 1 I covered installing FreeNAS
In Part 2 I covered basic FreeNAS configuration, including adding disks
In Part 3 I am now going to cover some of the more advanced topics:
- Setting up Software RAID
- Users & Groups
- File Management and the File Editor
- Backing up your System Configuration
Setting up a Software RAID
NOTE:
In Parts 1 & 2 I had 256Mb of RAM configured for our FreeNAS server. If you are creating a software RAID, you will need to have at least 512Mb of RAM, otherwise you may experience unpredictable behaviour when creating the RAID.
FreeNAS supports many types of disk RAID Arrays including:
- RAID 0
- RAID 1
- RAID5
- RAID 0/1/5
See Wikipedia for more information on what each of these types of RAID offer in terms of protection against failure and performance.
JBOD is also supported but is not RAID, it stands for Just a Bunch Of Disks.
In addition to the drive FreeNAS is installed on, we have two hard disks in our FreeNAS Server which we are going to set-up as a Software RAID.
Follow the instructions in Part 2 in the section titled Adding Disks to FreeNAS, but before clicking Add, change the Preformatted file system to Software RAID. It should look something like the following screen-shot for the first disk which I’ve called Disk1. The choice of name is up to you!

Click Add and then repeat for the second disk, the Disks Management window should now look like the following

Click Apply Changes to put the disks online.
We are now ready to create our RAID.
From the menu bar select Disks > Software RAID. With RAID 1 selected (see screen shot below)
 click on the + sign to create a RAID array.
Give the RAID a name, we will call it Disk in this example (see note later on).
Select the drives you want to be added to the array and then check the box titled Create and initialised RAID

Click Add. You will be taken to the previous screen where you newly created array is displayed.
Click Apply Changes. You should now get the following screen displayed
Note: in the following screen shot the RAID name was changed from Disk to RAD1
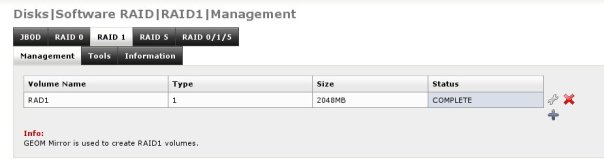
As we have chosen RAID 1 (disk mirroring) even though we used 2 x 2Gb hard disks, only 2Gb is available as usable storage. This is a feature of RAID 1.
The RAID Array now needs to be formatted.
From the menu bar select Disks > Format.
For Disk, select the RAID we have just created from the drop down menu.
Now give the volume a label, I this example we will call it RAID1
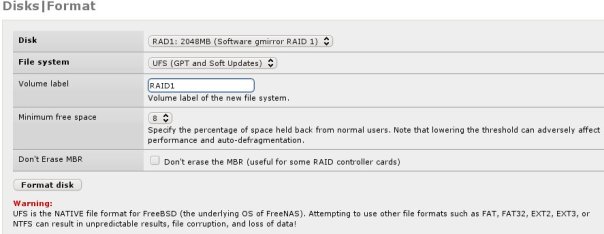
Now click Format disk to format the disk.
You will be asked to confirm your choice, click OK.
You will now see formatting information below the Format disk button similar to that below
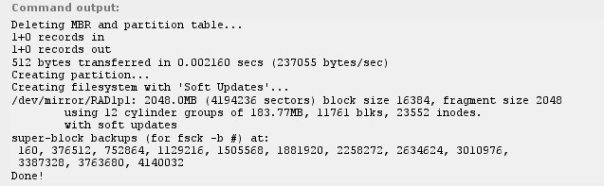
Done! will appear once formatting has completed.
The final thing left to do is to mount the disk.
From the menu bar select Disks > Mount Point
Click on the + sign on the far right to add a new mount point.
Select the disk to mount in the Disk field and in the Mount point name field give it a name, we will call it DataRAID.
Click Add.
You should see the following in Disk Mount Point Management window
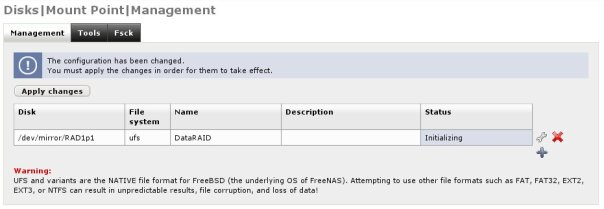
Click Apply changes to mount the disk.
To check the disk is mounted, click on System on the menu bar. You will see something like the following
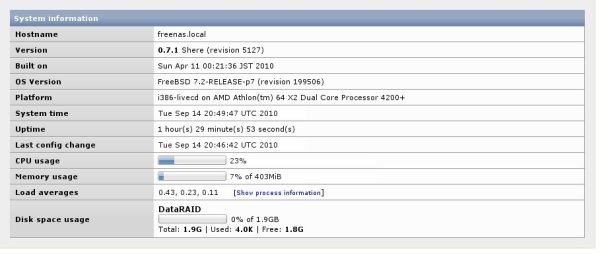
Note: Although my ‘live’ FreeNAS server is a re-cased Compaq DeskPro EN Pentium 3 800MHz PC with 512Mb RAM, for this tutorial I created a Virtual FreeNAS server in Virtualbox. Hence the rather higher CPU specification!
With the disk mounted, you can now share it. Information on how to do this can be found in Part 2 of this series of FreeNAS articles.
Setting up RAID 5 is very similar, the difference is that at least three disks are required. Gary Sims, author of Learning FreeNAS which can be purchased online, has created a great video which you can view here on how to set-up RAID5 in FreeNAS.
Users & Groups
In Part 2 I touched upon creating a user account in the section Setting up a User Account to Remotely Access the Share. I will now cover this in a bit more detail in relation access permissions to Disk Mount points.
When you create a disk mount point, there is a section called Access Restrictions.
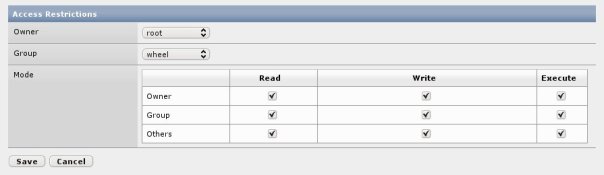
The defaults can be seen above, this is for my mount point called NASDisk1.
The owner is by default the account which created the mount point, normally Admin in FreeNAS. The Group, in this case wheel, restricts which group of users can access the mount point. The Mode section determines which collection of access permissions (Read, Write or eXecute) each category of user has, be it Owner, Group or Others.
From The FreeNAS menu bar select Advanced > File Manager and if asked to login login with your Admin account and password.
As FreeNAS runs FreeBSD, disk mount points are located in the /mnt directory. Open the /mnt directory by clicking on it.
On my FreeNAS server I have two disk drives and therefore two mount mount points, which like any Unix/ Linux OS take the form of a directory.
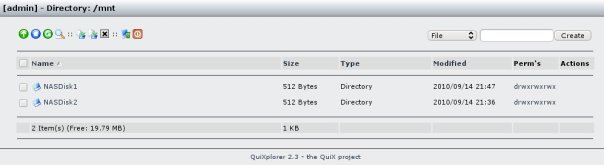
In the Perm’s column (short for Permissions) you will see the standard Unix Linux file permissions for the directory
|
Owner |
Group |
Other |
||||||
|
r |
w |
x |
r |
w |
x |
r |
w |
x |
r = Read w = Write x = eXecute
The above is prefixed with a ‘d’ if it is a directory, as with all PC operating systems, a directory is just a special type of file
Where permissions are absent, as in the following example for a file
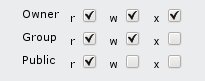
the earlier table would look like the following
|
Owner |
Group |
Other |
||||||
|
r |
w |
x |
r |
w |
x |
r |
w |
x |
|
r |
w |
x |
r |
w |
– |
r |
– |
– |
Which looks like this in File Manager

So, how does this all relate to users?
Well by default, if you create a directory using File Manager logged in as Admin, the default permissions are
drwxrwxr-x
When you create a user in FreeNAS, your primary group is Guest and no additional group is defined by default. Because your account is not the account which created the mount point i.e. Admin, you are therefore not the Owner and so Owner permissions do not apply.
As your account belongs to the Group guest, the Group the mount point belongs to is wheel, therefore Group permissions do not apply which means your account falls into the Other category. In this case this only allows you to Read and eXecute files but does not allow you to write!
There are two ways round this problem:
Either:
A. Change the mount point to it’s group matches that of the user, or better still change the group membership of the user to match the mount point. So make the user a member of the group wheel..
Or:
B. Login to File Manager with the account with which you wish to access the shares remotely, in this way that account is the owner of the directory and therefore has rwx access by default.
Note: It would not be advisable, for security reasons to change the permissions for Other to Write unless you were confident that allowing write access to all users was not going to be a problem, now or in the future.
For more information on Linux/ Unix file system permissions see Wikipedia
File Management
As we have already touched on File Management, it is worth covering it a bit more although there isn’t a massive amount to cover as it is mainly self explanatory.
The File manager supplied with FreeNAS is QuiXplorer which is a simple web based file manager.
You can:
- create, copy, move and delete files and directories
- change file and directory permissions
- browse the FreeNAS file system
- search for files
- change users permissions
The last item is probably the most interesting as you can manage user passwords, set whether the user can see hidden files and the level of permissions they have for managing users. An account can also be disabled from this option.
File Editor
Also in the main FreeNAS menu under Advanced is the File Editor, which allows you to browse for a file, Load it, edit it and then Save it. It is by no means advanced, but a useful addition to the toolbox should you feel brave enough to edit FreeNAS configuration files directly!
Backing up your System Configuration
Whilst it is great ‘tweaking’ your FreeNAS system configuration either via the menus or directly using the editor, mistakes do happen and things can go horribly wrong, So it is worth while to backup your system configuration on a regular basis.
From the main menu, click on System > Backup / Restore. The following screen will be displayed.
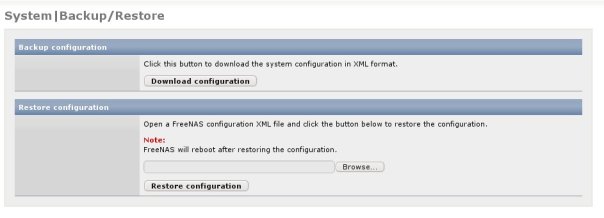
Click on Download configuration, this will allow you to save your configuration file locally to your PC. It will not save it to the FreeNAS server disks for obvious reasons!
To restore your configuration, browse to where your backup file is stored and click on Restore configuration.
Finally, if all else fails, rather than re-install FreeNAS you can reset the server back to Factory defaults by selecting System > Factory defaults.

Use with care and best to backup your configuration before resetting.
In part 4 of this article, I’ll be looking at e-Mail notification and some of the additional services FreeNAS can run like BitTorrent, which I had to leave out of this article due to space!
=-=-=-=-=
Powered by Blogilo

Hello. I have found your Blog very informative. I have had my FreeNas server running for a year or so now and just recently decided to upgrade to a 1000base-T network. All my windows 7 PC’s work fine with the throughput, but the FreeNas server doesn’t. It is on auto detect and seems to be stuck at 10base-T. When I try to set it the choices are:
10BaseT/UTP
100Base-TX
1000BASE-TX
1000Base-SX
From what I have read on 1000base TX and SX the TX is for use with cat6 and the SX is for Fiber. I am on cat5 and cat5e. I tried TX in half duplex but it failed. Now I’m looking for anything that could lead me in the right direction. I have two different gigabit Nic’s both of which were on the FreeNas hardware page. My server is just holding movies and family pictures I just want to be able to send data to and from the server a little faster. If you have any write ups on your network card setup or have any thoughts could I please see them?
Thanks for the great Info!
Murray Thompson
1000BASE-TX requires the use of CAT6 cables, for 1000BASE-T you can use CAT5e cables see http://www.duxcw.com/faq/network/gigstand.htm.
However, what I think is more important is the actual make and model of your Gbit Ethernet card, as this sounds like a driver compatibility issue.
Can you ping the FreeNAS server from another PC?
On my server I’m just using the on=board 100Mbps NIC.
FreeNAS runs FreeBSD so check the HCL at http://www.cyberciti.biz/files/freebsd-hardware-compatibility-list.html#ETHERNET. This lists compatible network cards, make sure that your is listed, if not get one which is, eBay is normally a good place to look.
Hope this helps
Whatever happen to part 4 of this series? I don’t see it anywhere.
Hi Randy,
The danger with planning for the future is that it is not always predictable. FreeNAS became a closed source project and was consequently forked and became NAS4Free. Since this article was written I’m now blogging about NAS4Free which carries on from FreeNAS v7. My most recent Blogs are opn MninDLNA and Subsonic/ Madsonic Media servers running under FreeNAS. If you want to know how to set-up Transmission in NAS4Free then see
I used to be recommended this web site through my cousin. I am no longer sure whether or
not this post is written by him as nobody else know such distinctive approximately my
problem. You’re wonderful! Thanks!